Internal Dev Procedures
Technology Lineage: 40+ Years of Production Success
TL;DR: API Logic Server represents the modern evolution of business rules technology proven across 6,000+ enterprise deployments spanning four decades, from Wang Labs PACE through Versata to today's cloud-native architecture.
Historical Evolution
1. Wang Labs PACE (1980s-1990s) - Original commercial business rules platform - 6,000+ corporate customers running mission-critical systems - Pioneered declarative multi-table derivations and constraints - Proved "5 rules replace 200 lines of code" at enterprise scale - Established automatic dependency ordering and chaining
2. Versata (1990s-2010s) - $3.4 billion startup backed by founders of Microsoft, Sybase, Ingres, Informix - Fortune 500 enterprise deployments - Advanced the rules engine with optimization (pruning, delta-based adjustments) - Demonstrated correctness and performance at massive scale - Validated the declarative paradigm across thousands of production systems
3. API Logic Server / GenAI-Logic (2020s-present) - Modern evolution: same proven patterns, contemporary stack - Python/SQLAlchemy (vs. Java/JDBC) - Cloud-native (Docker/Kubernetes) - Open source and extensible - GenAI integration (natural language → declarative rules) - Modern integration patterns (REST/JSON:API, Kafka, webhooks)
Key Insight: This technology is not experimental. The core architectural patterns (declarative rules, automatic dependency discovery, multi-table chaining, foreign key change handling) have been validated across 40+ years and thousands of production deployments.
Why Declarative Architecture Matters: The NL → DSL → Engines Pattern
Read: Declarative GenAI: The Architecture Behind Enterprise Vibe Automation
This Medium article explains the fundamental architectural distinction that makes GenAI-Logic different:
The Problem: "FrankenCode"
Traditional GenAI vibe tools generate 200+ lines of buggy procedural code that: - Misses corner cases (e.g., changing customer on order, changing product on item) - Violates SOA principles (logic dumped on client) - Creates instant technical debt (unmaintainable, opaque) - Requires explicit handlers for every possible change path
The Solution: Declarative GenAI
Natural Language → Domain-Specific Language → Runtime Engines
Instead of generating procedural code, GenAI generates declarative specifications executed by proven runtime engines:
- Database Layer: SQLAlchemy ORM with intelligent defaulting
- API Layer: JSON:API engine with full rule enforcement, Swagger docs, MCP support
- UI Layer: YAML-driven React Admin (working app, not scaffolding)
- Logic Layer: Rules engine providing: - Automatic pruned invocation (attribute-level granularity) - Dependency ordering (auto-discovered from rule definitions) - Optimized chaining (delta-based, avoids expensive SQL aggregates) - Automatic completeness (handles ALL change paths, not just obvious ones)
Critical: Rules as Correctness Guarantee
Declarative rules aren't optional or a "coding style" - they're a fundamental architectural requirement for correctness in multi-table logic:
- Dependency chains:
Product.unit_pricechange transitively affectsItem.unit_price→Item.amount→Order.amount_total→Customer.balance - Foreign key changes: When
Order.customer_idchanges, engine automatically adjusts both old and new customer balances - Automatic completeness: Engine handles ALL possible change paths; procedural code inherently misses corner cases
Why procedural fails: Even AI-generated code misses critical cases because it requires explicit handlers for every change path. The rules engine eliminates this entire class of bugs through automatic dependency analysis and chaining.
The Paradox Resolution: Declarative DSL in Python, executed by runtime engine handling 95% of typical business logic (remaining 5% uses standard Python event handlers).
GenAI Prompt Engineering: Natural Language → Structured Specifications
The ChatGPT Project Creation Pipeline
The genai-logic create command translates natural language requirements into complete working projects using fine-tuned ChatGPT with structured prompt engineering.
Key Principle: AI generates declarative specifications (models + rules), not procedural code. The runtime engines provide correctness guarantees.
Prompt Engineering Architecture
Location: system/genai/prompt_inserts/
Core Templates:
-
sqlite_inserts.prompt- Main orchestrator: -
sqlite_inserts_model_test_hints.prompt- Critical generation rules: - "If you create sum, count or formula Logic Bank rules, then you MUST create a corresponding column in the data model" - Use autonum keys for ALL tables (including junction tables) - Create classes, never tables (singular names, capitalized) - No check constraints (use rules instead) - Foreign key columns (not relationship names) for test data -
logic_inserts.prompt- Rule generation: -
response_format.prompt- Structured output schema:
Model + Logic Co-Generation (Key Insight)
Unlike existing database projects, GenAI creation modifies the data model to support logic:
Example Input:
Customer.balance = Sum(Order.amount_total where date_shipped is null)
Order.amount_total = Sum(Item.amount)
Order.item_count = Count(Items); can't ship if item_count == 0
ChatGPT Automatically Creates:
- Customer class with balance column (Decimal)
- Order class with amount_total column (Decimal)
- Order class with item_count column (Integer)
- Corresponding LogicBank rules for all derivations
- Test data with derived attributes pre-initialized
Critical Pattern: Derived attributes materialize as database columns. This enables: - Efficient queries (indexed, no runtime aggregation) - Scalable performance (pruning, delta adjustments) - Simple constraints (balance <= credit_limit works on stored value)
Training Examples: Teaching ChatGPT Rule Patterns
Location: org_git/ApiLogicServer-src/tests/genai_tests/logic_training/
Format: *.prompt (input) + *.txt (expected output) → ft.jsonl (fine-tuning data)
Pattern Categories:
-
Chain Up (Aggregation + Constraint) -
emp_depts.prompt: Department.total_salary = sum(Employee.salary); total_salary <= budget -genai_demo.prompt: Customer.balance = sum(Order.amount_total); balance <= credit_limit - Teaches: Derive first, constrain second (two-step pattern) -
Counts as Existence Checks -
genai_demo.prompt: Order.item_count = Count(Items); constraint: can't ship if item_count == 0 - Teaches: Use count for validation, not just analytics -
Cardinality Patterns (Qualified Any) -
products.prompt: Total notices + severity 5 notices; error if orderable with bad notices -graduate.prompt: Probation count + sick days count; graduation eligibility constraint - Teaches: Multiple counts (total + qualified) for complex conditions -
Ready Flag (Conditional Aggregations) -
ready_flag.prompt: Customer.balance = sum(Order.amount_total where ready == True AND date_shipped is None) - Teaches: Qualified sums with multiple conditions, cascading flags -
Chain Down (Copy/Formula Propagation) - Item.unit_price = copy(Product.unit_price) - price change doesn't affect old orders - Item.ready = Order.ready (formula propagation) - Teaches: Difference between copy (point-in-time) and formula (live reference)
Common AI Mistakes (Corrections)
Several *_corrected_prompt.txt files document typical errors:
1. Wrong Relationship Path (airport_corrected_prompt.txt):
- ❌ Original: "airplane's passengers must be less than seating capacity"
- Problem: No direct Airplane → Passenger relationship
- ✅ Corrected: "flight's passengers must be less than its Airplane's seating capacity"
- Lesson: AI needs explicit relationship path
2. Constraint Depends on Derived Flag (products_corrected_prompt.txt):
- ❌ Original: "product is orderable IF no severity 5 notices"
- Problem: Makes orderable derived, then uses it in constraint (circular)
- ✅ Corrected: "RAISE ERROR if product.orderable == True AND has severity 5 notices"
- Lesson: Flag is input, constraint validates it (not derived from constraint conditions)
3. Negative Condition Logic:
- ❌ Harder: "if student.can_graduate, then must have < 3 probations"
- ✅ Easier: "error if can_graduate == True AND probation_count > 2"
- Pattern: not(row.flag and bad_condition) is clearest for AI
Fine-Tuning Process
Training Data: logic_training/ft.jsonl (~374KB)
- JSONL format for ChatGPT fine-tuning API
- Generated from 10+ prompt/response pairs
- Format: {"messages": [{"role": "system", ...}, {"role": "user", ...}, {"role": "assistant", ...}]}
Generation Script: logic_training/create_json_l.py
- Converts pattern examples → training data
- System prompt + user prompt + expected response
- Updates ft.jsonl with new examples
CLI Commands Using This System
Create from natural language:
genai-logic create --project-name=my_system --using="your requirements here"
# Pipeline: assemble prompts → ChatGPT API → parse WGResult → generate project
Translate logic (existing DB):
genai-logic logic-translate --project-name=. --using-file=docs/logic
# Uses logic_translate.prompt: NL in docs/logic → rules in logic/logic_discovery/
Add logic to existing project:
genai-logic add-logic --using="The Order's amount_total is sum of Item amounts"
# Appends rules to logic/declare_logic.py or logic/logic_discovery/
Why This Architecture Succeeds
Traditional GenAI Code Generation: - Outputs: 200+ lines of procedural code - Problems: Misses corner cases, violates SOA, creates technical debt - Example miss: Foreign key change (Order.customer_id) requires adjusting BOTH old and new customer balances
Declarative GenAI (This System): - Outputs: 5 rules (declarative specifications) - Execution: Proven rules engine (40+ years, 6,000+ deployments) - Coverage: Engine handles ALL change paths automatically via dependency analysis - Result: Correctness guarantee + 40X code reduction
Critical Insight: AI doesn't need to "think through" all possible change paths. It translates requirements → rules, and the engine provides completeness.
Natural Language → DSL → Runtime Engine (not NL → procedural code)
Testing Examples
Location: system/genai/examples/
Each directory contains:
- *.prompt - User requirements (various formality levels)
- *.response_example - Expected ChatGPT output
- Subdirectories for iterations (genai_demo_iteration/, genai_demo_iteration_discount/)
Key Examples:
- genai_demo/ - Complete Check Credit + No Empty Orders (primary teaching example)
- genai_demo_informal.prompt - Less structured input (tests robustness)
- ready_flag/ - Multi-use-case with conditional logic
- airport/ - Complex 10+ table system
- time_tracking_billing/ - Real-world business scenario
Purpose: Validate prompt engineering works across formality levels and complexity ranges.
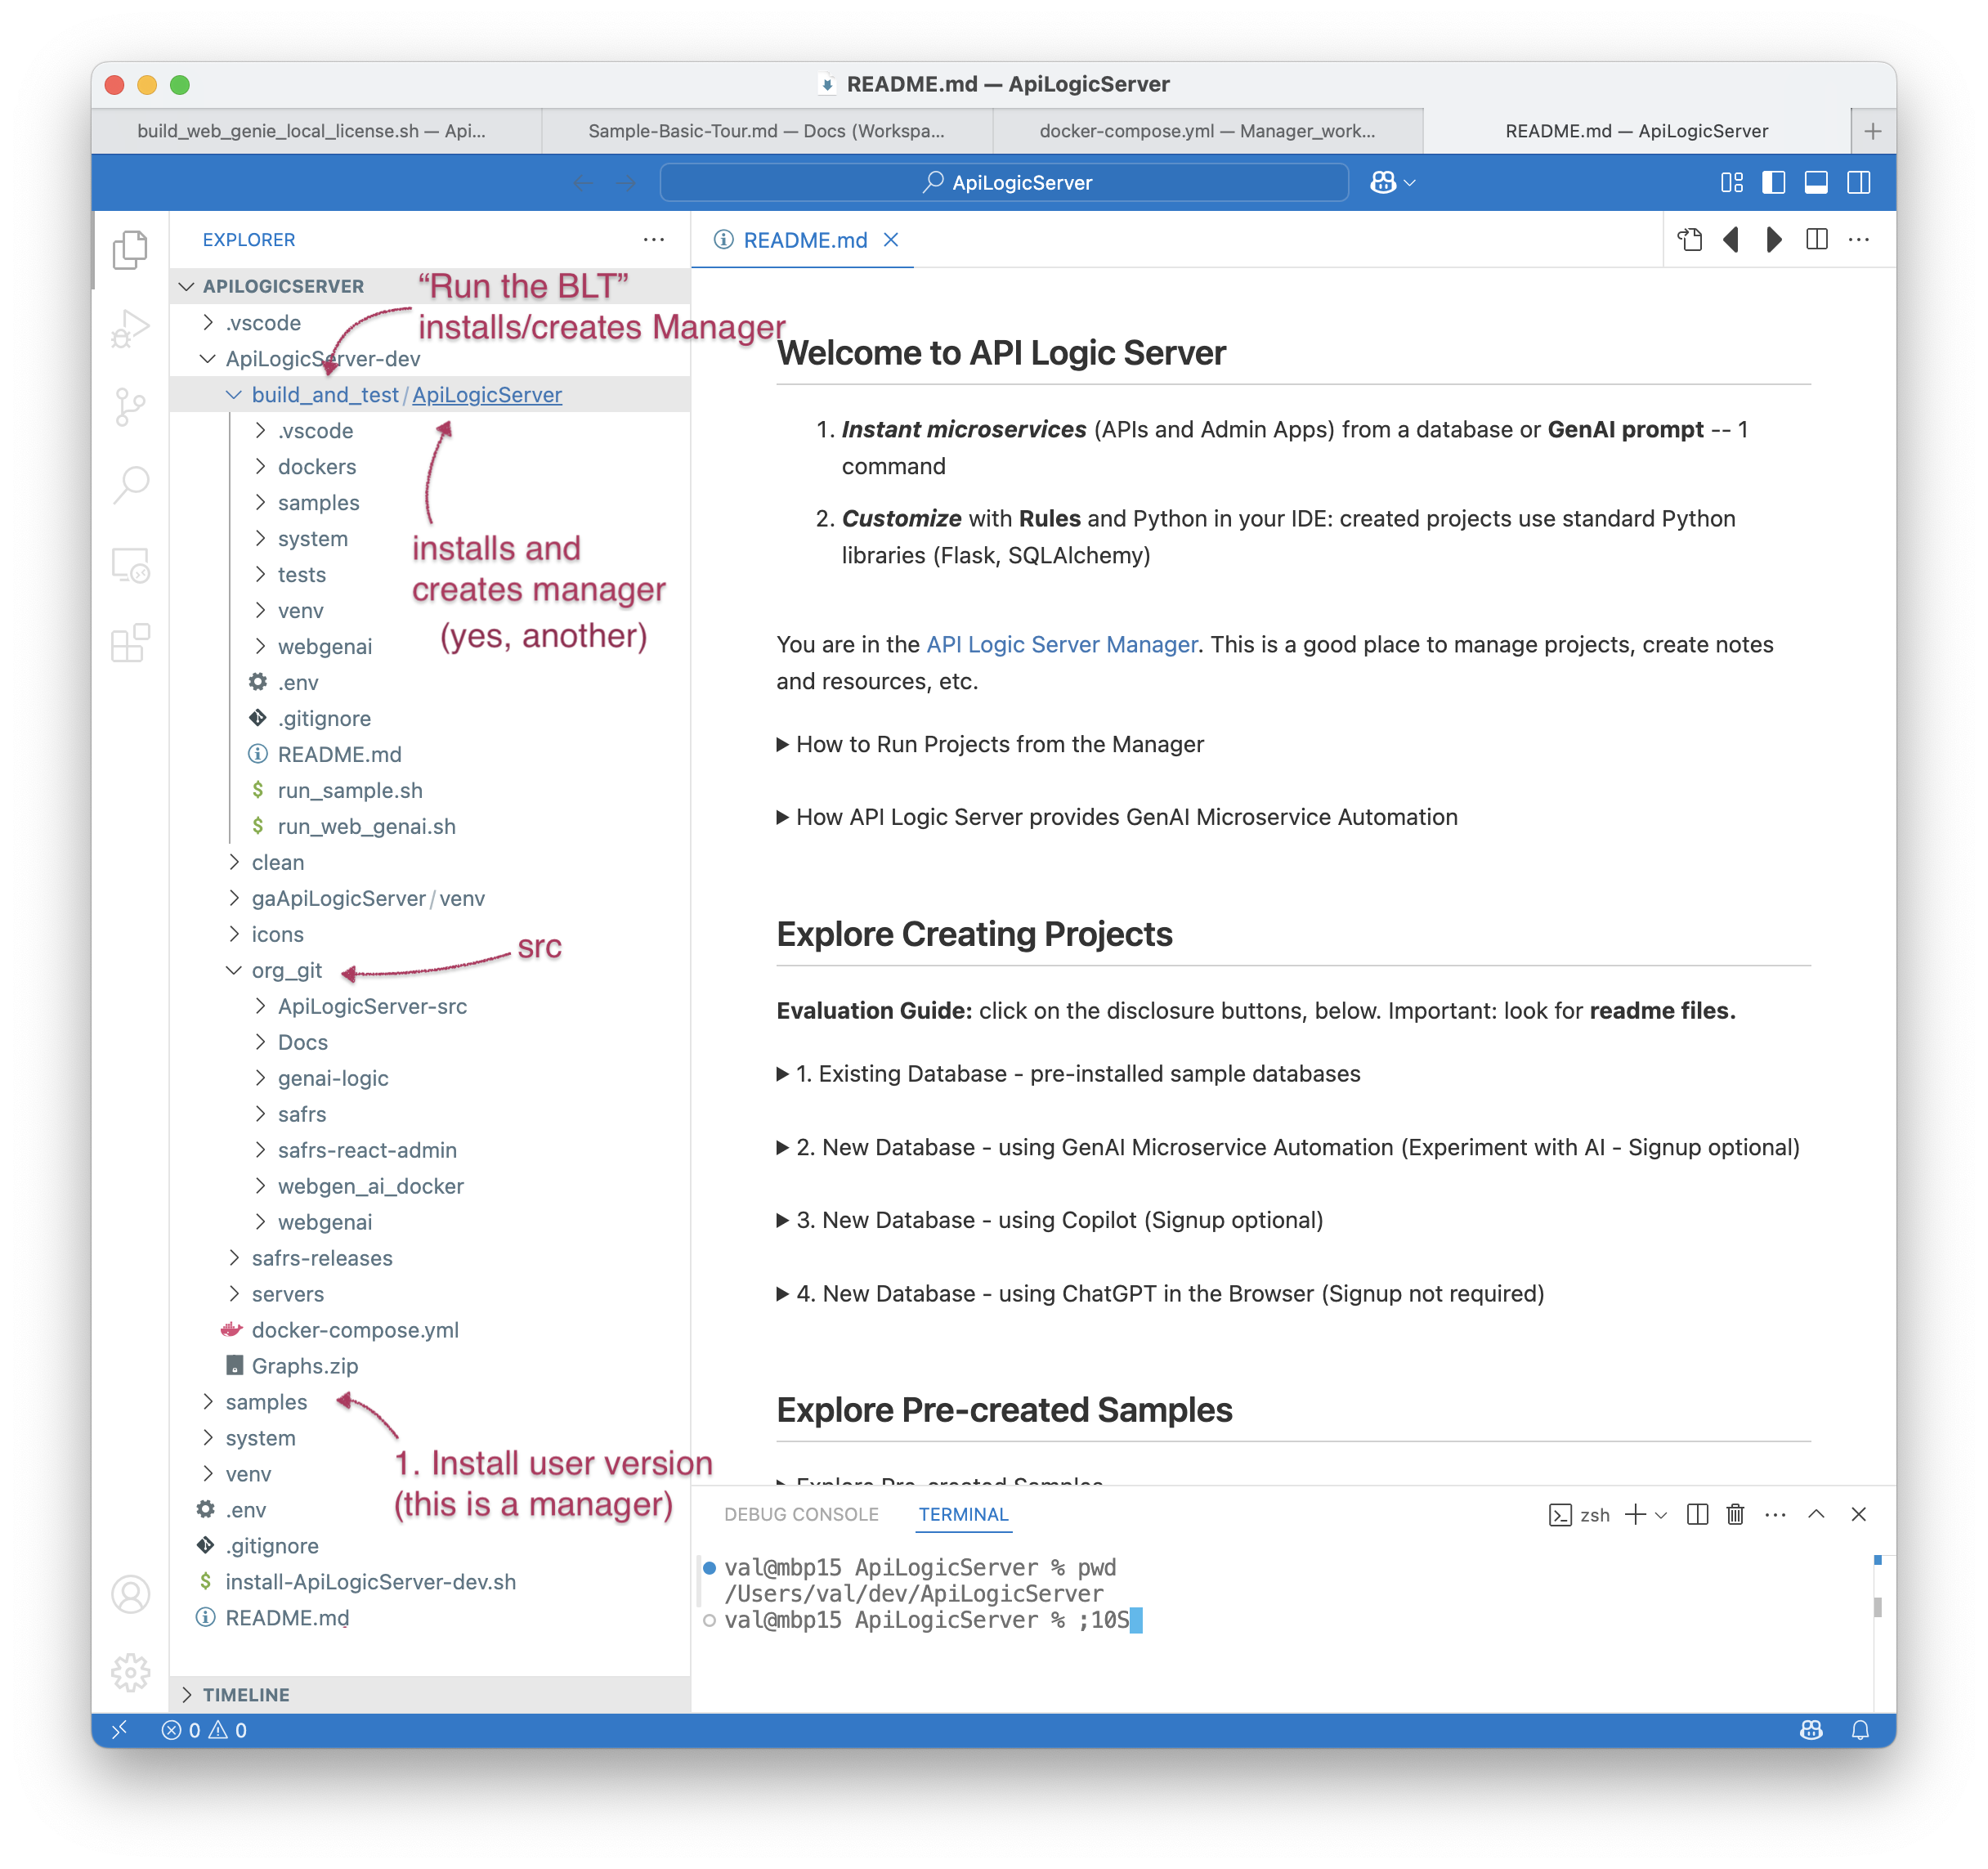
CRITICAL: Understanding the Nested Manager Architecture
The development environment has two distinct Manager workspaces:
1. Seminal Manager - ~/dev/ApiLogicServer/ApiLogicServer-dev/
- Original Manager installation from als start
- Stable, persistent workspace
- Contains build_and_test/ directory
- Used to run the BLT process
- Houses org_git/ with source repositories
2. BLT Manager (Nested) - ~/dev/ApiLogicServer/ApiLogicServer-dev/build_and_test/ApiLogicServer/
- Created and refreshed by the BLT (Build, Load and Test) process
- Contains rebuilt/tested version of API Logic Server
- Contains sample projects (basic_demo, nw_sample, etc.) for testing
- Has its own venv shared by test projects
- Gets regenerated with each BLT run
- Contains system/ApiLogicServer-Internal-Dev/copilot-dev-context.md for AI context restoration
Complete Directory Structure:
~/dev/ApiLogicServer/ApiLogicServer-dev/          # Seminal Manager
├── build_and_test/
│   └── ApiLogicServer/                           # BLT Manager (nested workspace)
│       ├── samples/                              # Sample/test projects
│       │   ├── basic_demo_sample/
│       │   ├── nw_sample/
│       │   └── ...
│       ├── venv/                                 # Shared venv for test projects
│       ├── system/
│       │   └── ApiLogicServer-Internal-Dev/      # Internal dev tooling
│       │       ├── copilot-dev-context.md        # AI context restoration
│       │       └── install-ApiLogicServer-dev.sh # Dev environment setup
│       └── docs/                                 # Training materials
└── org_git/
    ├── ApiLogicServer-src/                       # Framework source (edit here)
    │   └── api_logic_server_cli/
    │       └── prototypes/
    │           ├── base/                         # Templates for created projects
    │           └── manager/                      # Manager workspace templates
    |       └── tests/
    |           └── build_and_test/               # system rebuild and test -> build_and_test
    └── Docs/                                     # Documentation project
        └── docs/
            └── Architecture-Internals.md         # This page
Development Workflow:
1. Edit framework code in org_git/ApiLogicServer-src/
2. Run BLT from Seminal Manager (rebuilds, tests, regenerates BLT Manager)
3. Test with sample projects in BLT Manager workspace
4. BLT Manager gets fresh context from system/ApiLogicServer-Internal-Dev/copilot-dev-context.md after each rebuild
Why This Architecture:
- Isolation: Changes being tested don't affect stable Seminal Manager
- Clean slate: Each BLT run creates fresh testing environment
- Shared venv: Test projects reuse BLT Manager's venv (speeds testing)
- Context preservation: system/ApiLogicServer-Internal-Dev/copilot-dev-context.md re-establishes understanding after rebuild
Cross-References for Full Context
For Strategic Architecture Understanding:
- system/ApiLogicServer-Internal-Dev/copilot-dev-context.md - Technology lineage, declarative architecture, NL→DSL→Engines pattern
- Medium Article - Complete architectural rationale
For Created Project Development:
- Manager-level .copilot-instructions.md - How to CREATE projects
- Project-level .copilot-instructions.md - How to EXTEND/CUSTOMIZE projects
- docs/training/logic_bank_api.prompt - LogicBank API reference (in each project)
- docs/training/testing.md - Behave testing guide (1755 lines, in each project)
For End Users: - API Logic Server Documentation - Complete user guide - Installation - Setup procedures - Tutorial - Step-by-step learning
This page does not address created projects, rather, it is about the API Logic Server system used to create projects. It is for those who want to extend the product or understand how it works, not for those simply using the product.
How to Install it
The subsections below described the steps to:
- Obtain the software from GitHub
- Open the dev workspace in your IDE
- Create the "initial 'venv'"
- Perform the critical "Smoke Test" to ensure system operation
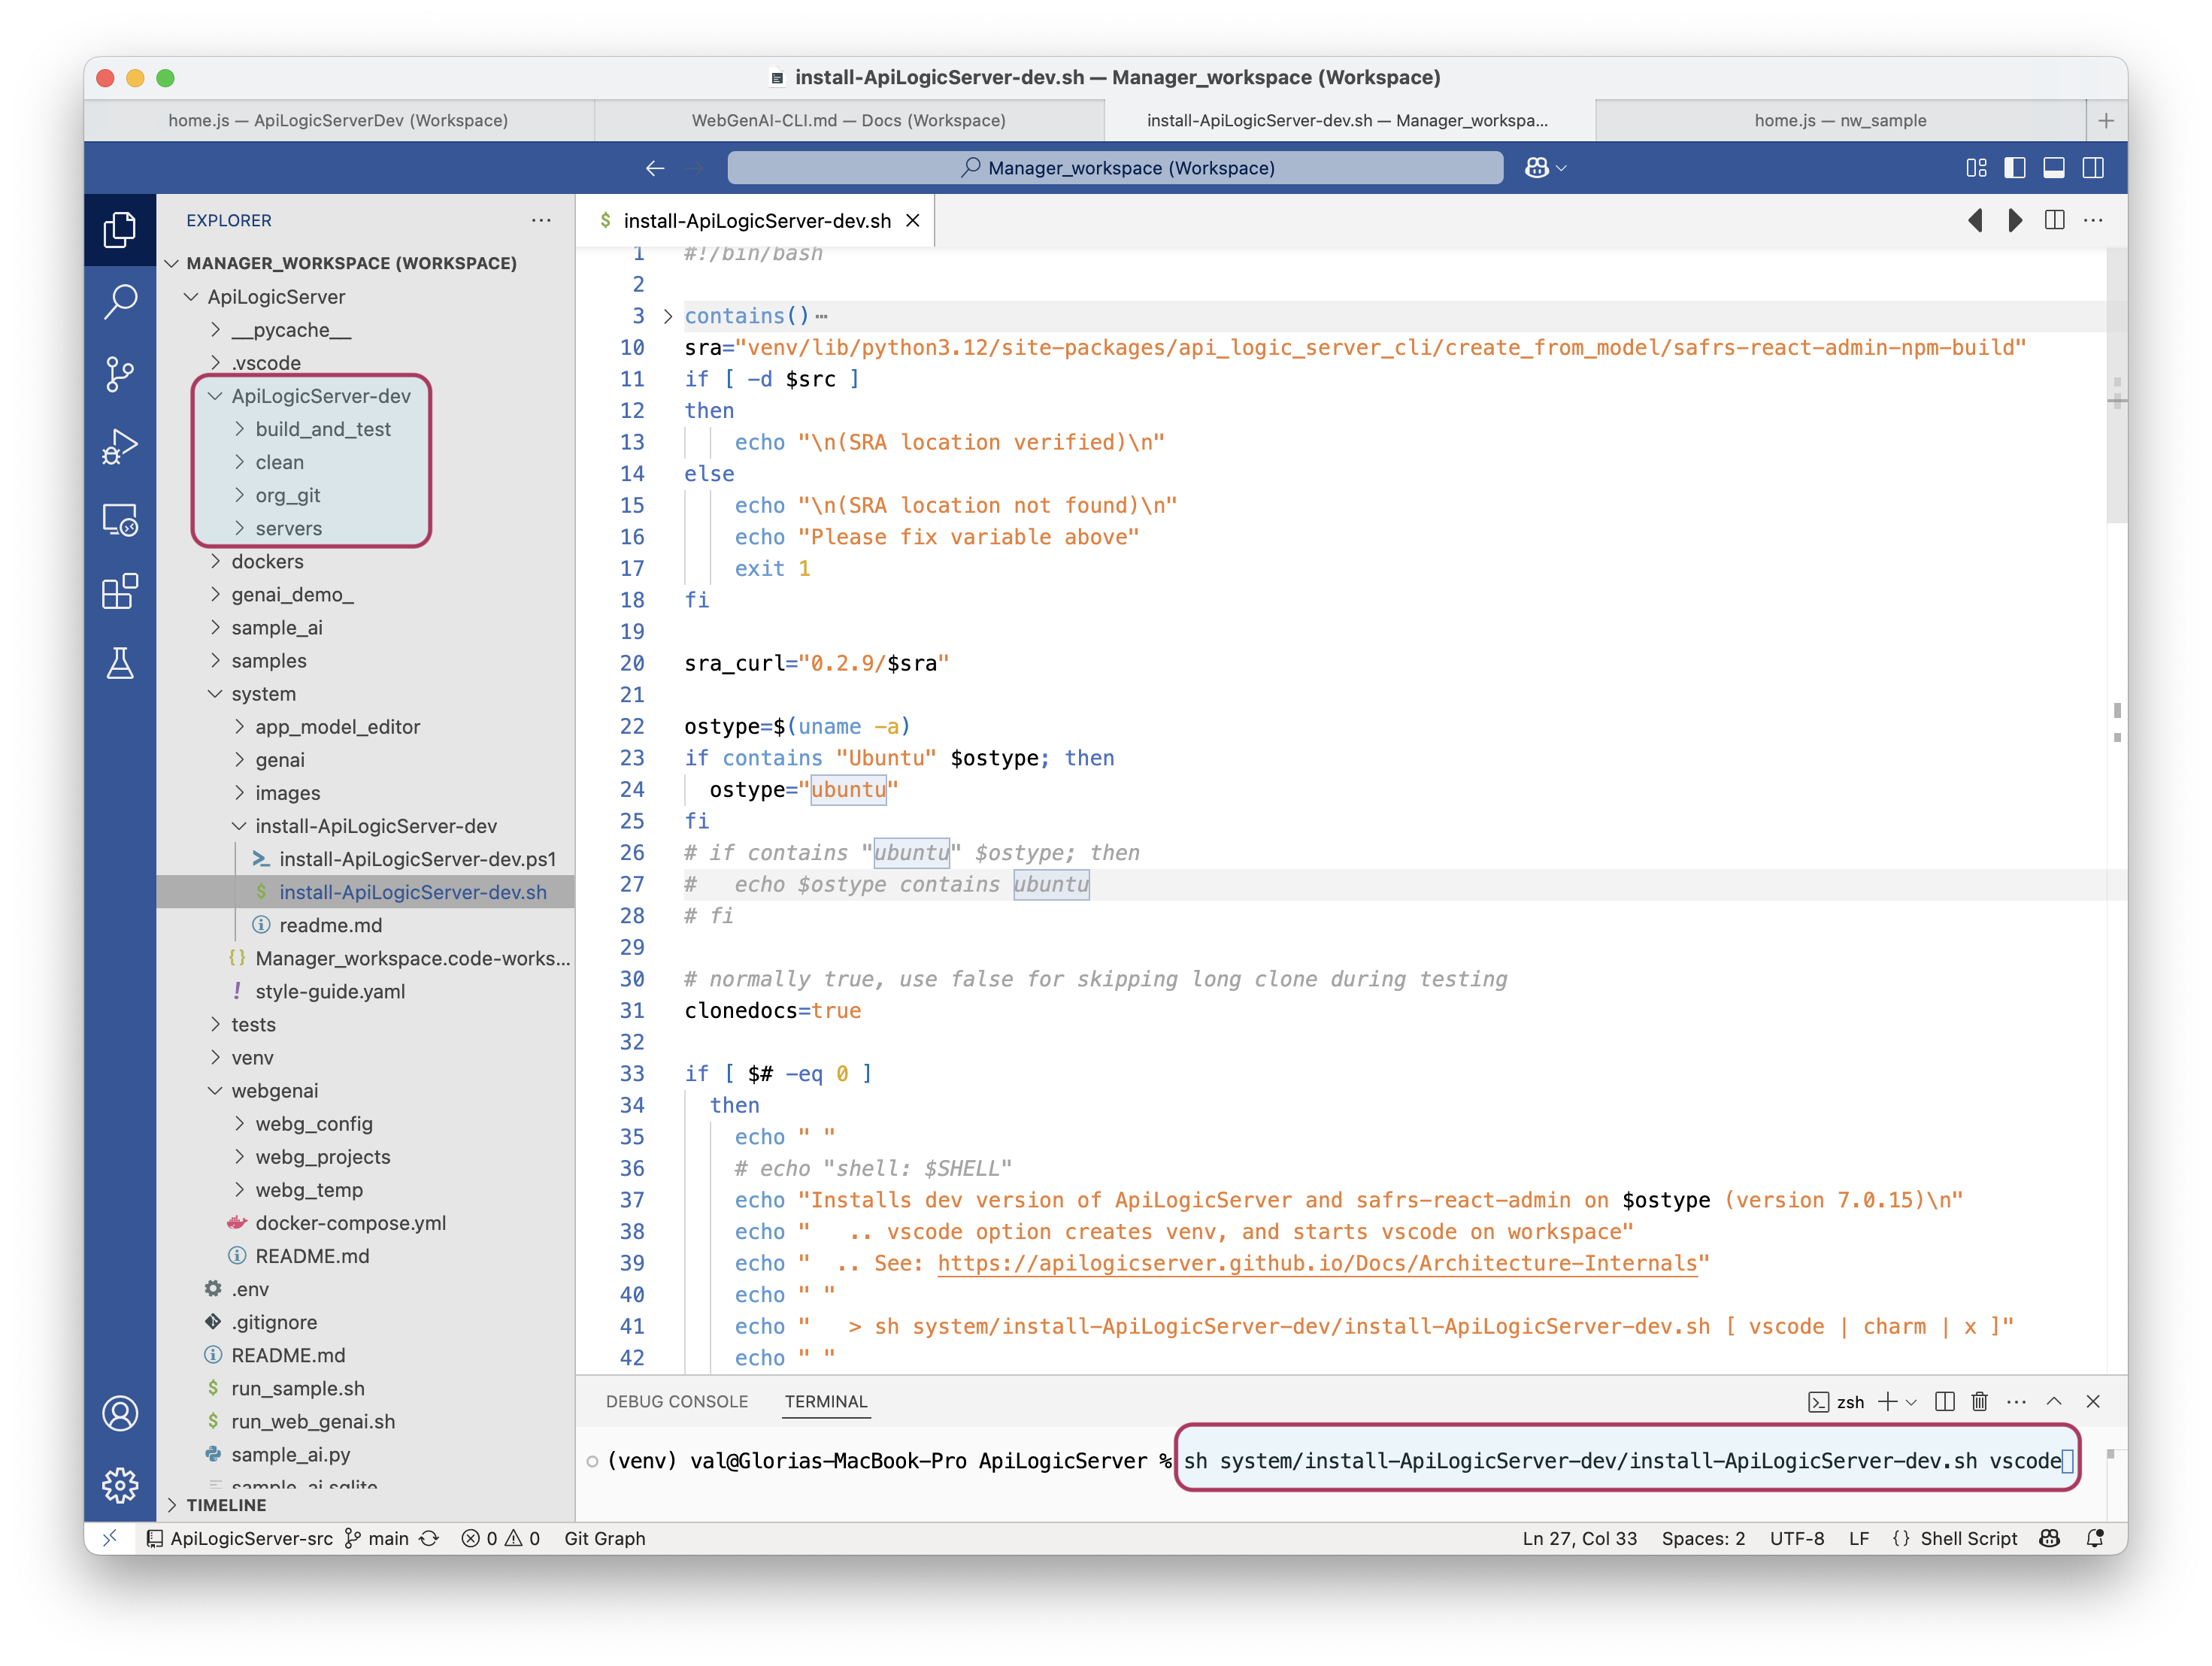
Manager Internal Development Setup
To create the dev enviroment (result shown above):
-
Install the user version of the API Logic Server
- let's assume it's
~/dev/ApiLogicServer-dev
- let's assume it's
-
Start the Manager:
als start - Be sure you have installed the VSCode CLI - see the VSCode CLI procedure
- In your CLI terminal window:
- Note: Windows users use
install-ApiLogicServer-dev.ps1)
- Note: Windows users use
sh system/ApiLogicServer-Internal-Dev/install-ApiLogicServer-dev.sh
ApiLogicServer/ApiLogicServer-dev/org_git/ApiLogicServer-src/api_logic_server_cli/api_logic_server_info.yaml, with:
last_created_date: May 28, 2025 12:08:45
last_created_project_name: /Users/val/dev/ApiLogicServer/ApiLogicServer-dev/servers/basic_demo
last_created_version: 14.05.16
The install procedure will use git clone to create folders in ~/dev/ApiLogicServer/ApiLogicServer-dev/org/:
Admin App Source
This section is only if you did not load from the script. You need to obtain the build of safrs react admin.
It's basically straightforward, though note the cp command which copies the safrs-react-admin runtime to API Logic Server for subsequent creation of API Logic Projects:
echo "\ncopying build (sra - safrs-react-admin) --> ApiLogicServer"
cp -r ../build api_logic_server_cli/create_from_model/safrs-react-admin-npm-build
For more information, see Admin App Reuse.
Note:
curlmust be installed for this procedure.
Determine your IDE
API Logic Server has been developed with both VSCode and PyCharm. While in many cases we prefer PyCharm, we have gravitated to VSCode since it supports an "initial venv".
This means that for the many test projects, there is no need to create a per-project venv. This speeds unit testing considerably.
Importantly, this relies on the Build and Test procedure to create the "initial
venv".
You will find that the VSCode install has a large number of Run Configs for these test projects. In general, the created project can be run immediately in another window of VSCode, using the "initial venv".
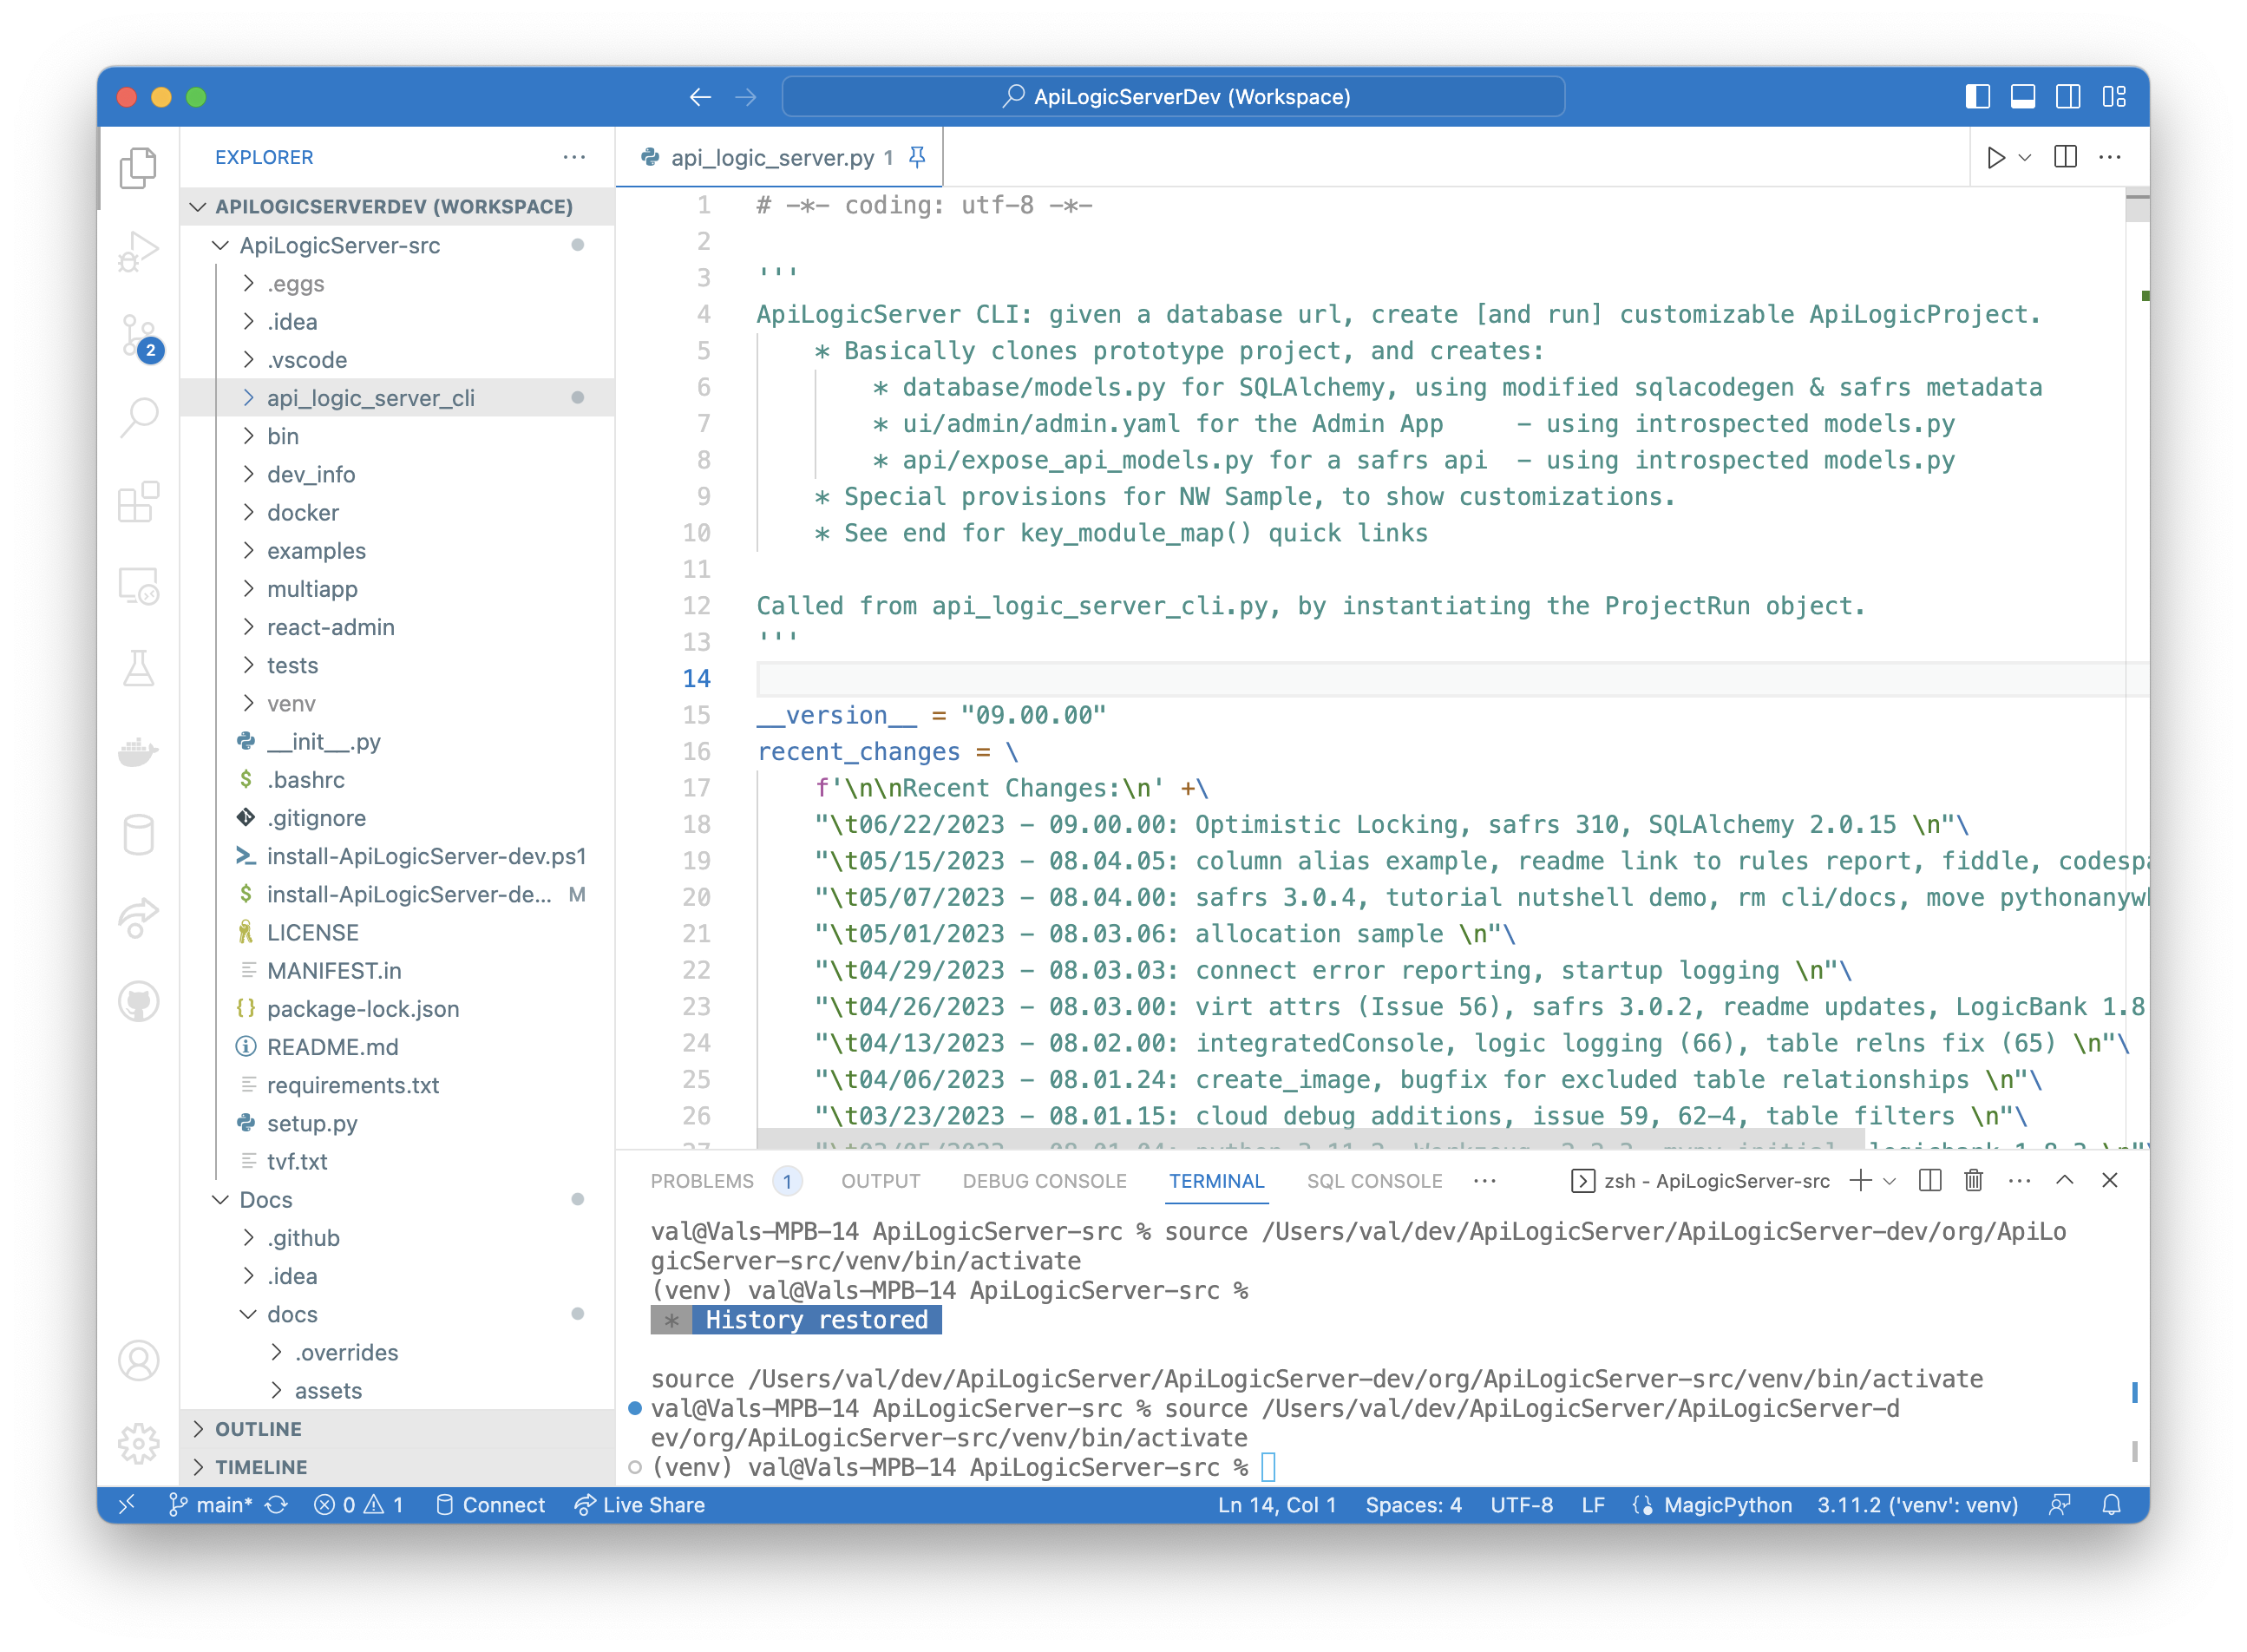
Open the dev workspace
install-ApiLogicServer... will create a project workspace (~/dev/ApiLogicServer/ApiLogicServer-dev/org_git/ApiLogicServer-src/.vscode/ApiLogicServerDev.code-workspace), and open it VS Code or PyCharm.
cd ~/dev/ApiLogicServer/ApiLogicServer-dev/org_git/ApiLogicServer-src/.vscode
code ApiLogicServerDev.code-workspace
Python requires a virtual environment; the procedure differs for vscode vs. charm:
vscodeprojects are created with avenvand are ready to run the Launch Configurations to create the samplecharmprojects require that you create thevenvwith the PyCharm
It should look something like this:
Run the BLT
It is tiresome to create a venv for each project. So, the system creates projects with a VSCode property identifying the venv.
-
In actual practice, this is the manager's
venv. -
For the dev environment, it is calculated to the
venvof the BLT:- Note: the dev env BLT is not valid here, since it does not contain the CLI (which is needed for projects)
-
So, your first task is to run the BLT. It is simplest to run it without testing, just to create the
venv(and verify your installation).- Execute the 2nd Run Config (BLT - Hold the Tomato) to create the
venvused for created projects, such as the Sample (see next section):
- Execute the 2nd Run Config (BLT - Hold the Tomato) to create the
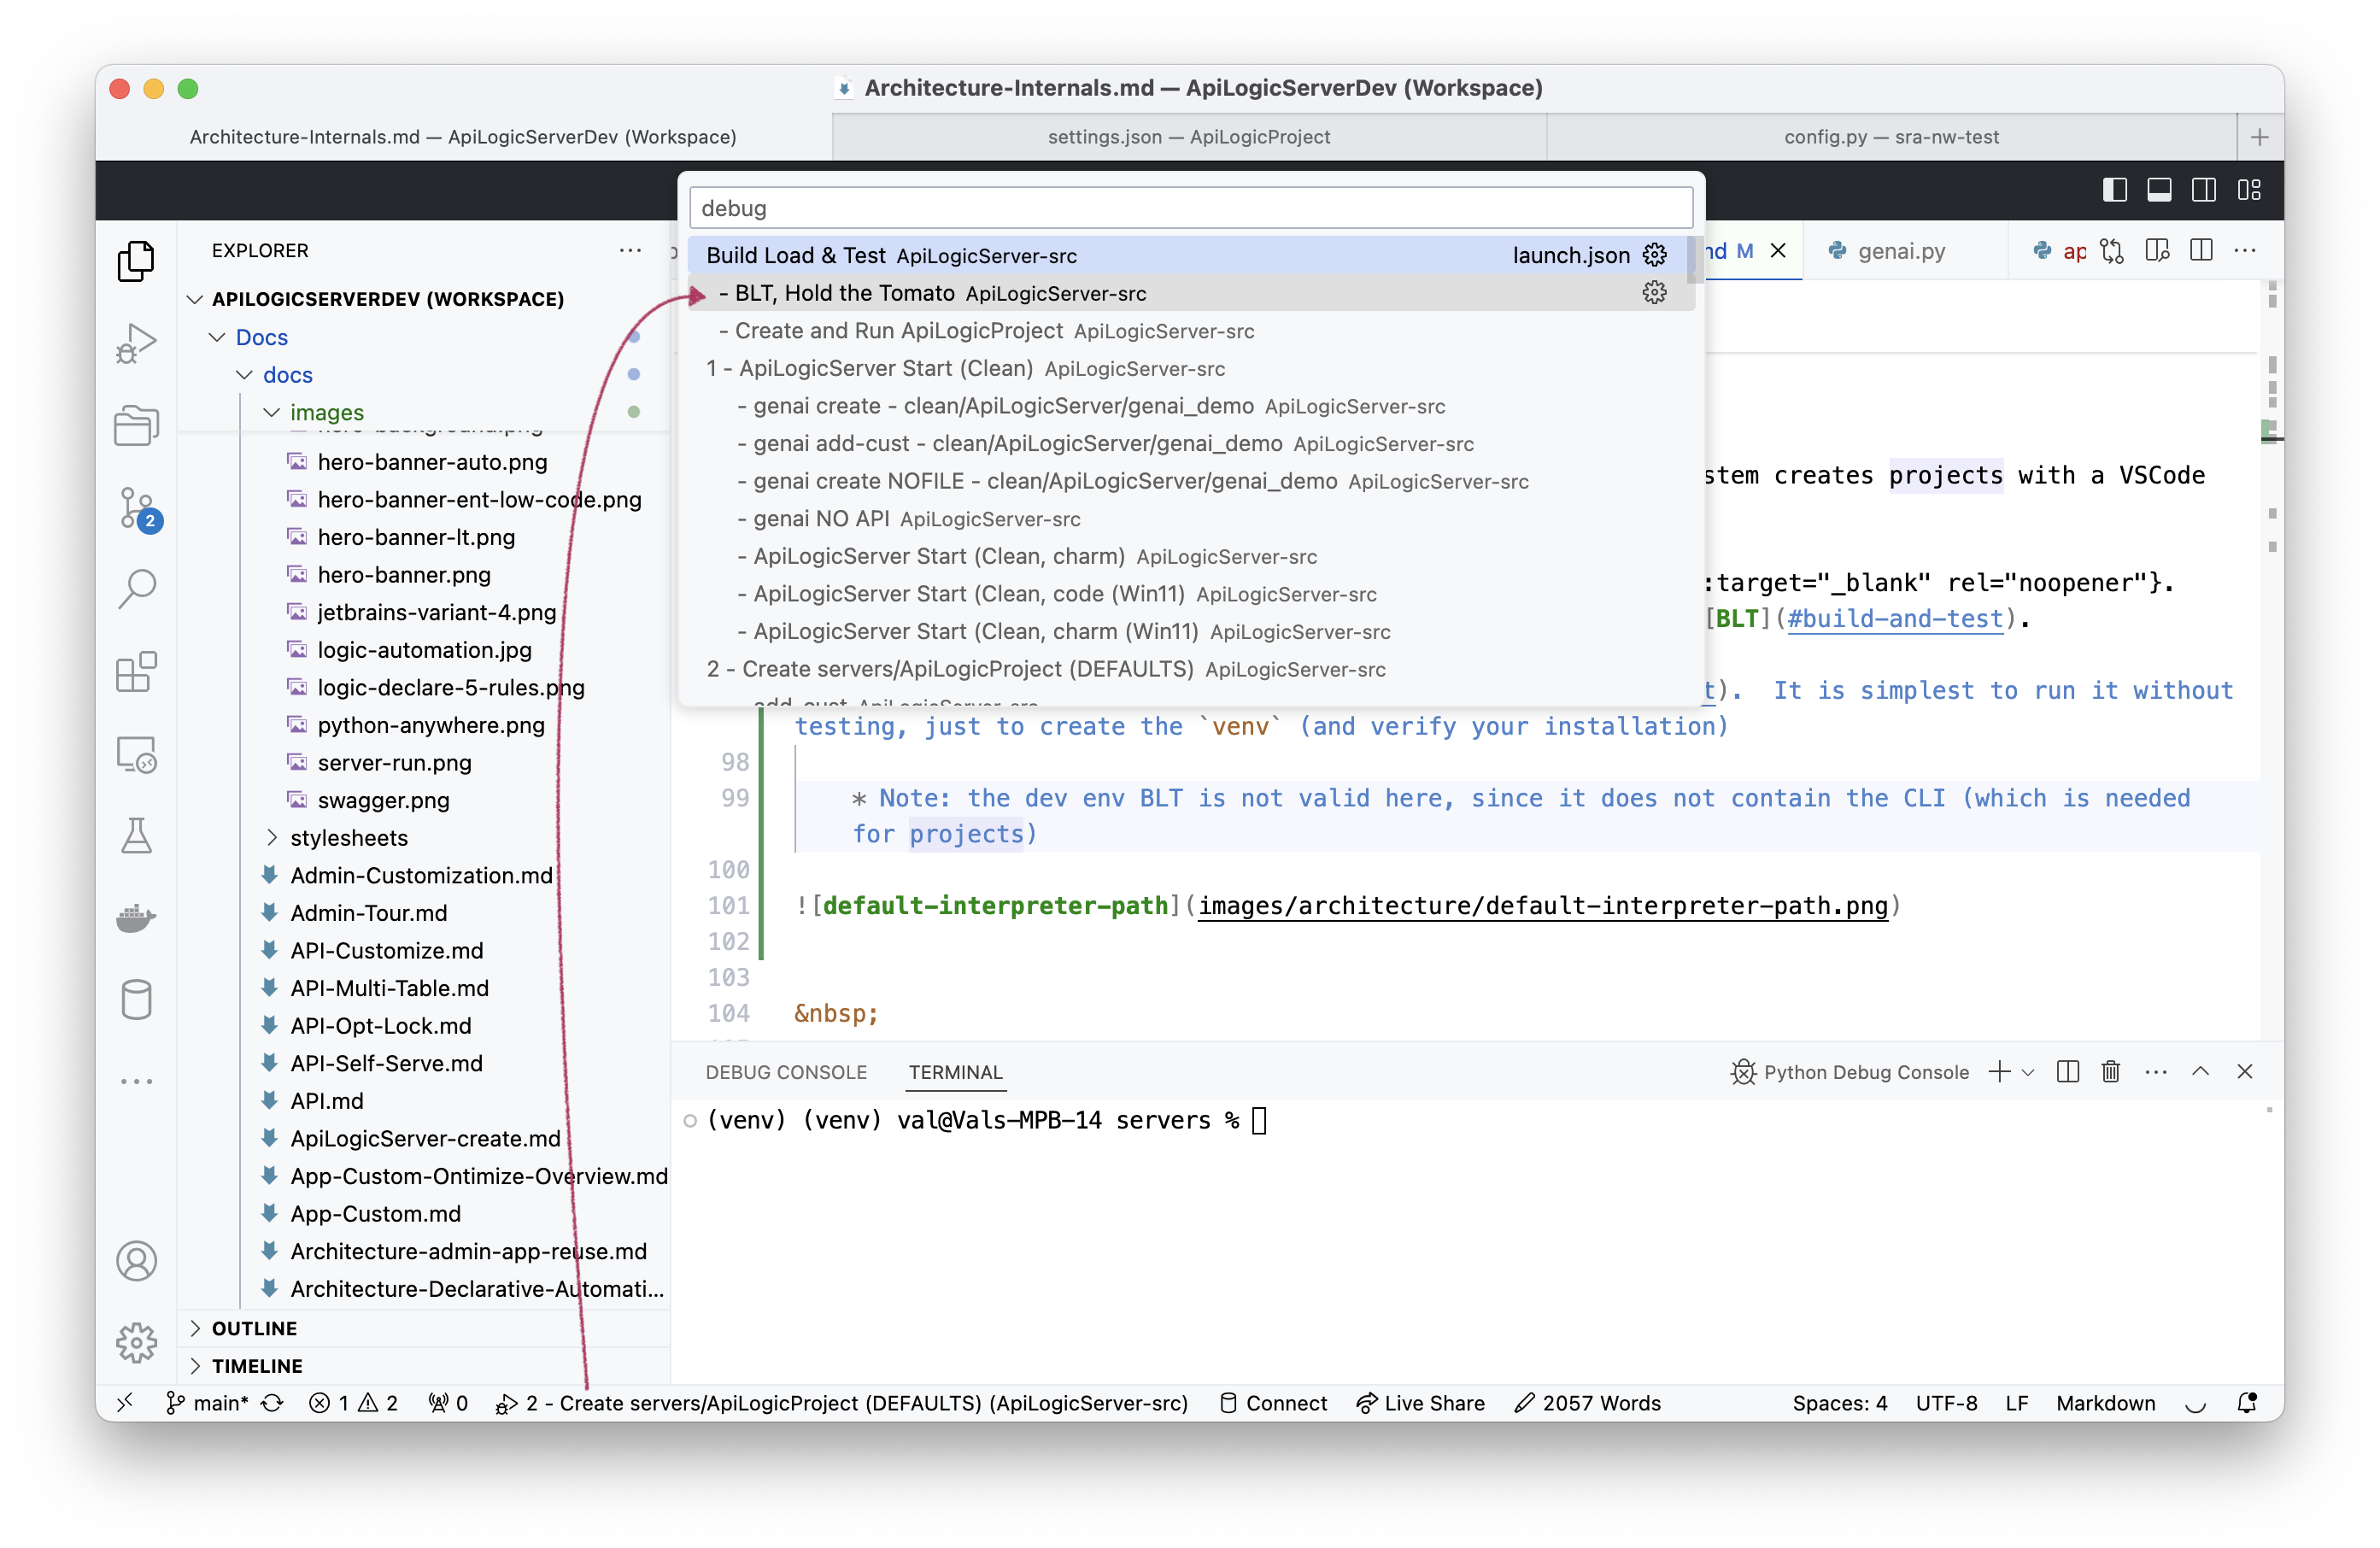
- Verify you have a
venvat as shown above at:ApiLogicServer/ApiLogicServer-dev/build_and_test/ApiLogicServer
Setup Required
If this fails, a common error is that sra is not installed at api_logic_server_cli/create_from_model/safrs-react-admin-npm-build. This can happen if the install procedure was not followed, or failed.
Obtain the sra build folder, and copy it to the location above.
Critical "Smoke Test"
This is the "smoke test" of API Logic Server. In general, this should be successful prior to pushing changes.
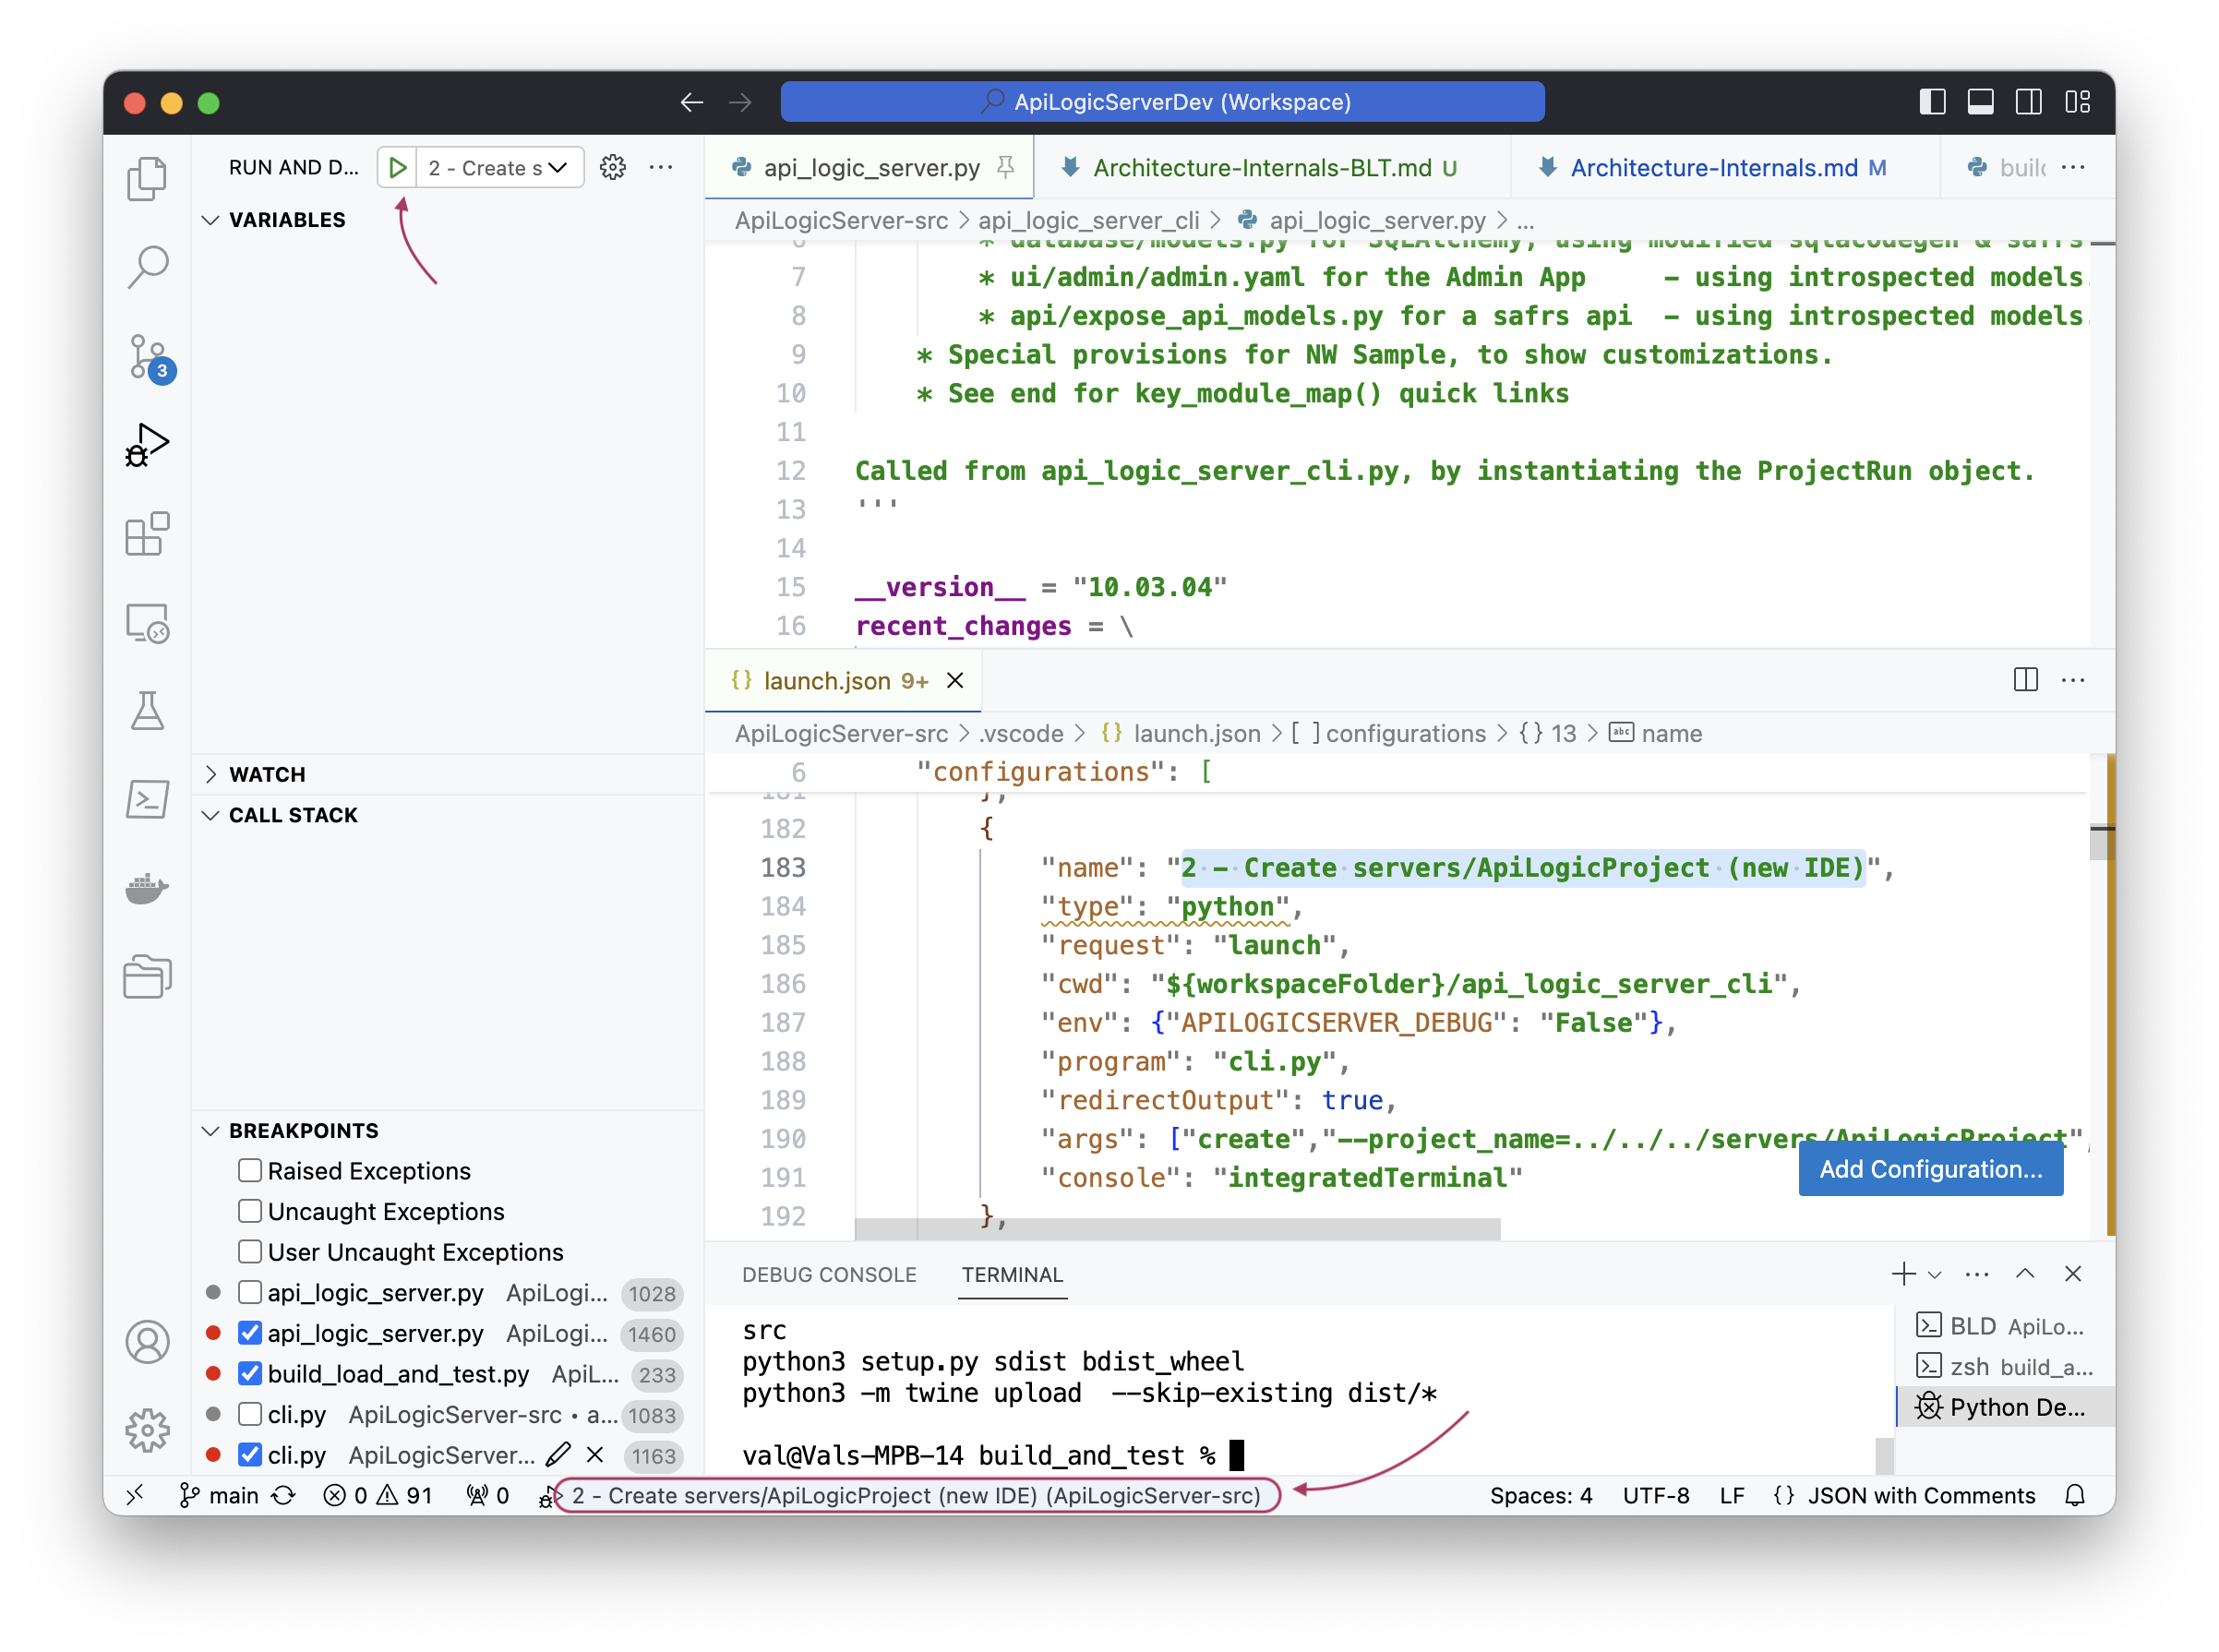
Create the Sample
Once in your IDE, you can run the pre-defined launch configuration 2 - Create servers/ApiLogicProject (new IDE) to create and run the sample. This creates ~/dev/servers/ApiLogicProject.
Run the Sample
Open it in another window of VSCode and ensure it runs.
- Run the admin app, and
- Use the documented procedures to add customizations for APIs, Logic and Security.
Run Behave Tests
A critical test is the Behave Test. It tests a dozen or so transactions, exercising the API and Logic.
- Use the Run Config in the created project:
Behave Run.
Ongoing dev
Follow these procesures to introduce changes, test them, and perform releases.
Introduce enhancements, test
Note the Run Configurations below:
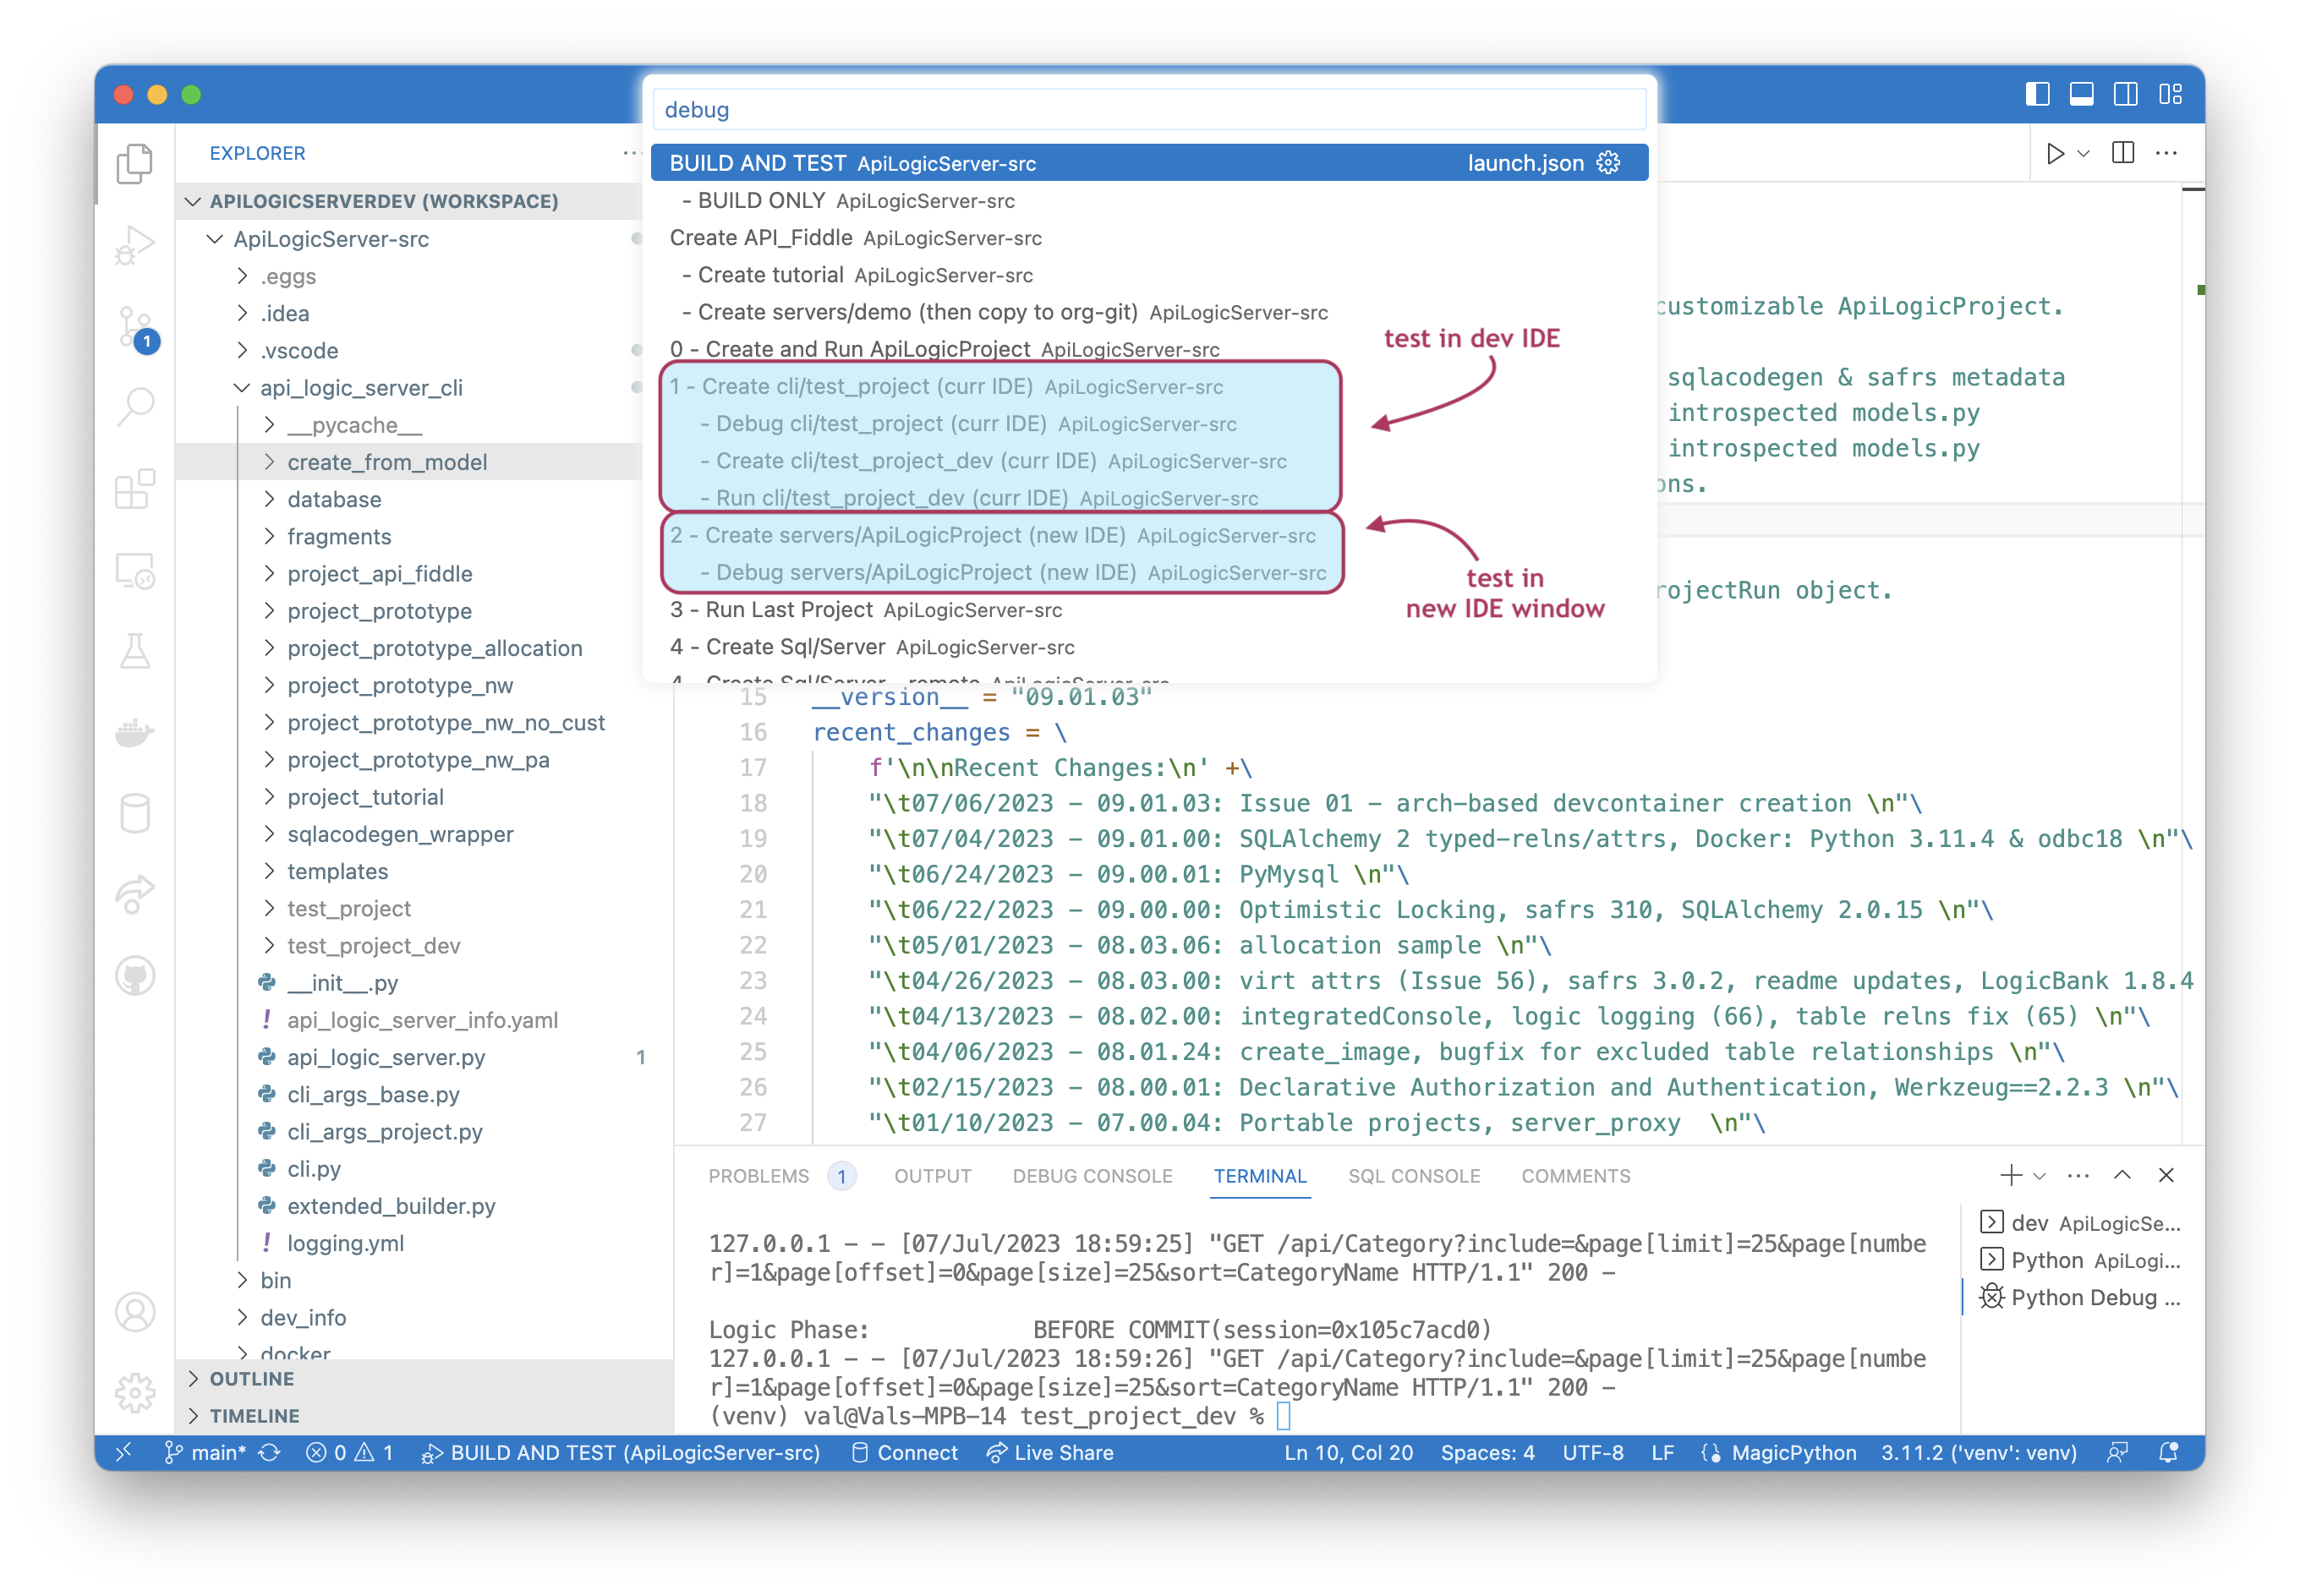
Consider using Run Config #1 to create project inside your current IDE instance. Note:
-
You can use the debugger (inside the IDE dev instance) to debug the altered project
-
The created/altered project is git-ignored, so is not part of any branch
-
Note you can create 2 projects, eg, to test base vs. dev
You can then use Run Config #2 to test it in a new project / ide instance.
- Run the behave tests to ensure existing functionality is not broken
Update CLI creation
Update api_logic_server_cli/project_prototype (and probably api_logic_server_cli/project_prototype_nw) for enchanced creation
Build and Test
This is a VSCode Run Configuration used for final pre-release testing. It builds the project, installs, it, and runs several dozen tests.
- Update the version number first in
api_logic_server_cli/api_logic_server.py
 venv can be used for projects
You will be using this as a shared venv.
For more information, see here.
Releasing
Build and Test should run on Macs, Linux (Ubuntu) and Windows 11. Once these are successful, release as follows:
- At the root of
ApiLogicServer-src, with novenv - Run
This will upload to Pypi. You of course need credentials.
- Delete the build folders:
ApiLogicServer.egg-info,build,dist - Open
docker/api_logic_server.Dockerfile - Update the build number (line 4:
--tag apilogicserver/api_logic_server:10.03.16) - Copy/paste/run the instructions at the top:
# GA release -- DELETE BUILD DIRS FIRST

# docker buildx build --push -f docker/api_logic_server.Dockerfile --tag apilogicserver/api_logic_server:10.03.16 -o type=image --platform=linux/arm64,linux/amd64 .
# docker buildx build --push -f docker/api_logic_server.Dockerfile --tag apilogicserver/api_logic_server:latest -o type=image --platform=linux/arm64,linux/amd64 .
Get Docs working
The install procedure also installs Org-ApiLogicServer/Docs. Follow it's readme. It's built on mkdocs.
Docs used in Project Creation
Copy readme files (and remove !!!) from:
-
github (to acquire more recent version since release)
-
dev docs, iff exists (gold version in docs, not prototypes).
Used by Sample-AI; Sample-Integration (nw-), Tutorial, Tutorial-3 (3 projects), Sample-Basic-Demo; Manager
api_logic_server_cli/create_from_model/api_logic_server_utils.py#copy_md() provides:
-
Removing !!! -- special handling:
- Text remains indented (becomes block quote - renders like code)
- Except if 1st line has ## - then remove indents to retain sections
-
Image references are made absolute (to github).
- Doc Links are made absolute.
Demo readme mapping (Manager-readme.md front-matter) — ⚠️ gotcha
Demo projects (e.g. demo_customs_clvs, demo_customs_surtax, demo_allo_*, basic_demo_*) get a project-specific readme.md instead of the generic one. This is driven entirely by data, not code:
Docs/docs/Manager-readme.mdfront-matter contains<prefix>: <readme-basename>lines, e.g.:create_readme.py(read_mgr_readme()+create_readme()) reads this table, sorts by prefix length descending, then takes the first prefix for whichproject_name.startswith(prefix)is true — renames the project'sreadme.mdtoreadme_standard.md, thencopy_md()s<readme-basename>.mdfromDocs/docs/over it.
The trap: startswith() matching means a new project whose name is a superset of an existing prefix will silently match the existing (wrong) entry unless a more-specific prefix is added. E.g. before demo_customs_surtax had its own entry, "demo_customs_surtax".startswith("demo_customs") was True, so it silently got the CLVS readme (Customs-readme.md) — wrong content, no error, easy to miss.
When adding a new demo whose name extends an existing prefix:
- Create its specific gold readme in
Docs/docs/<New-Readme>.md - Add a new, longer prefix line to
Manager-readme.md, e.g.demo_customs_surtax: Customs-readme-surtax— do not rename/remove the shorter existing entry (other projects may still rely on it as a fallback) - No code change needed in
create_readme.py— the length-descending sort + first-match-wins already prefers the more specific entry - Regenerate the affected project's
readme.md(viacopy_md(), or by hand-applying its mkdocs→markdown transforms — seecopy_md()above) to verify the new mapping actually resolves
Testing Packages
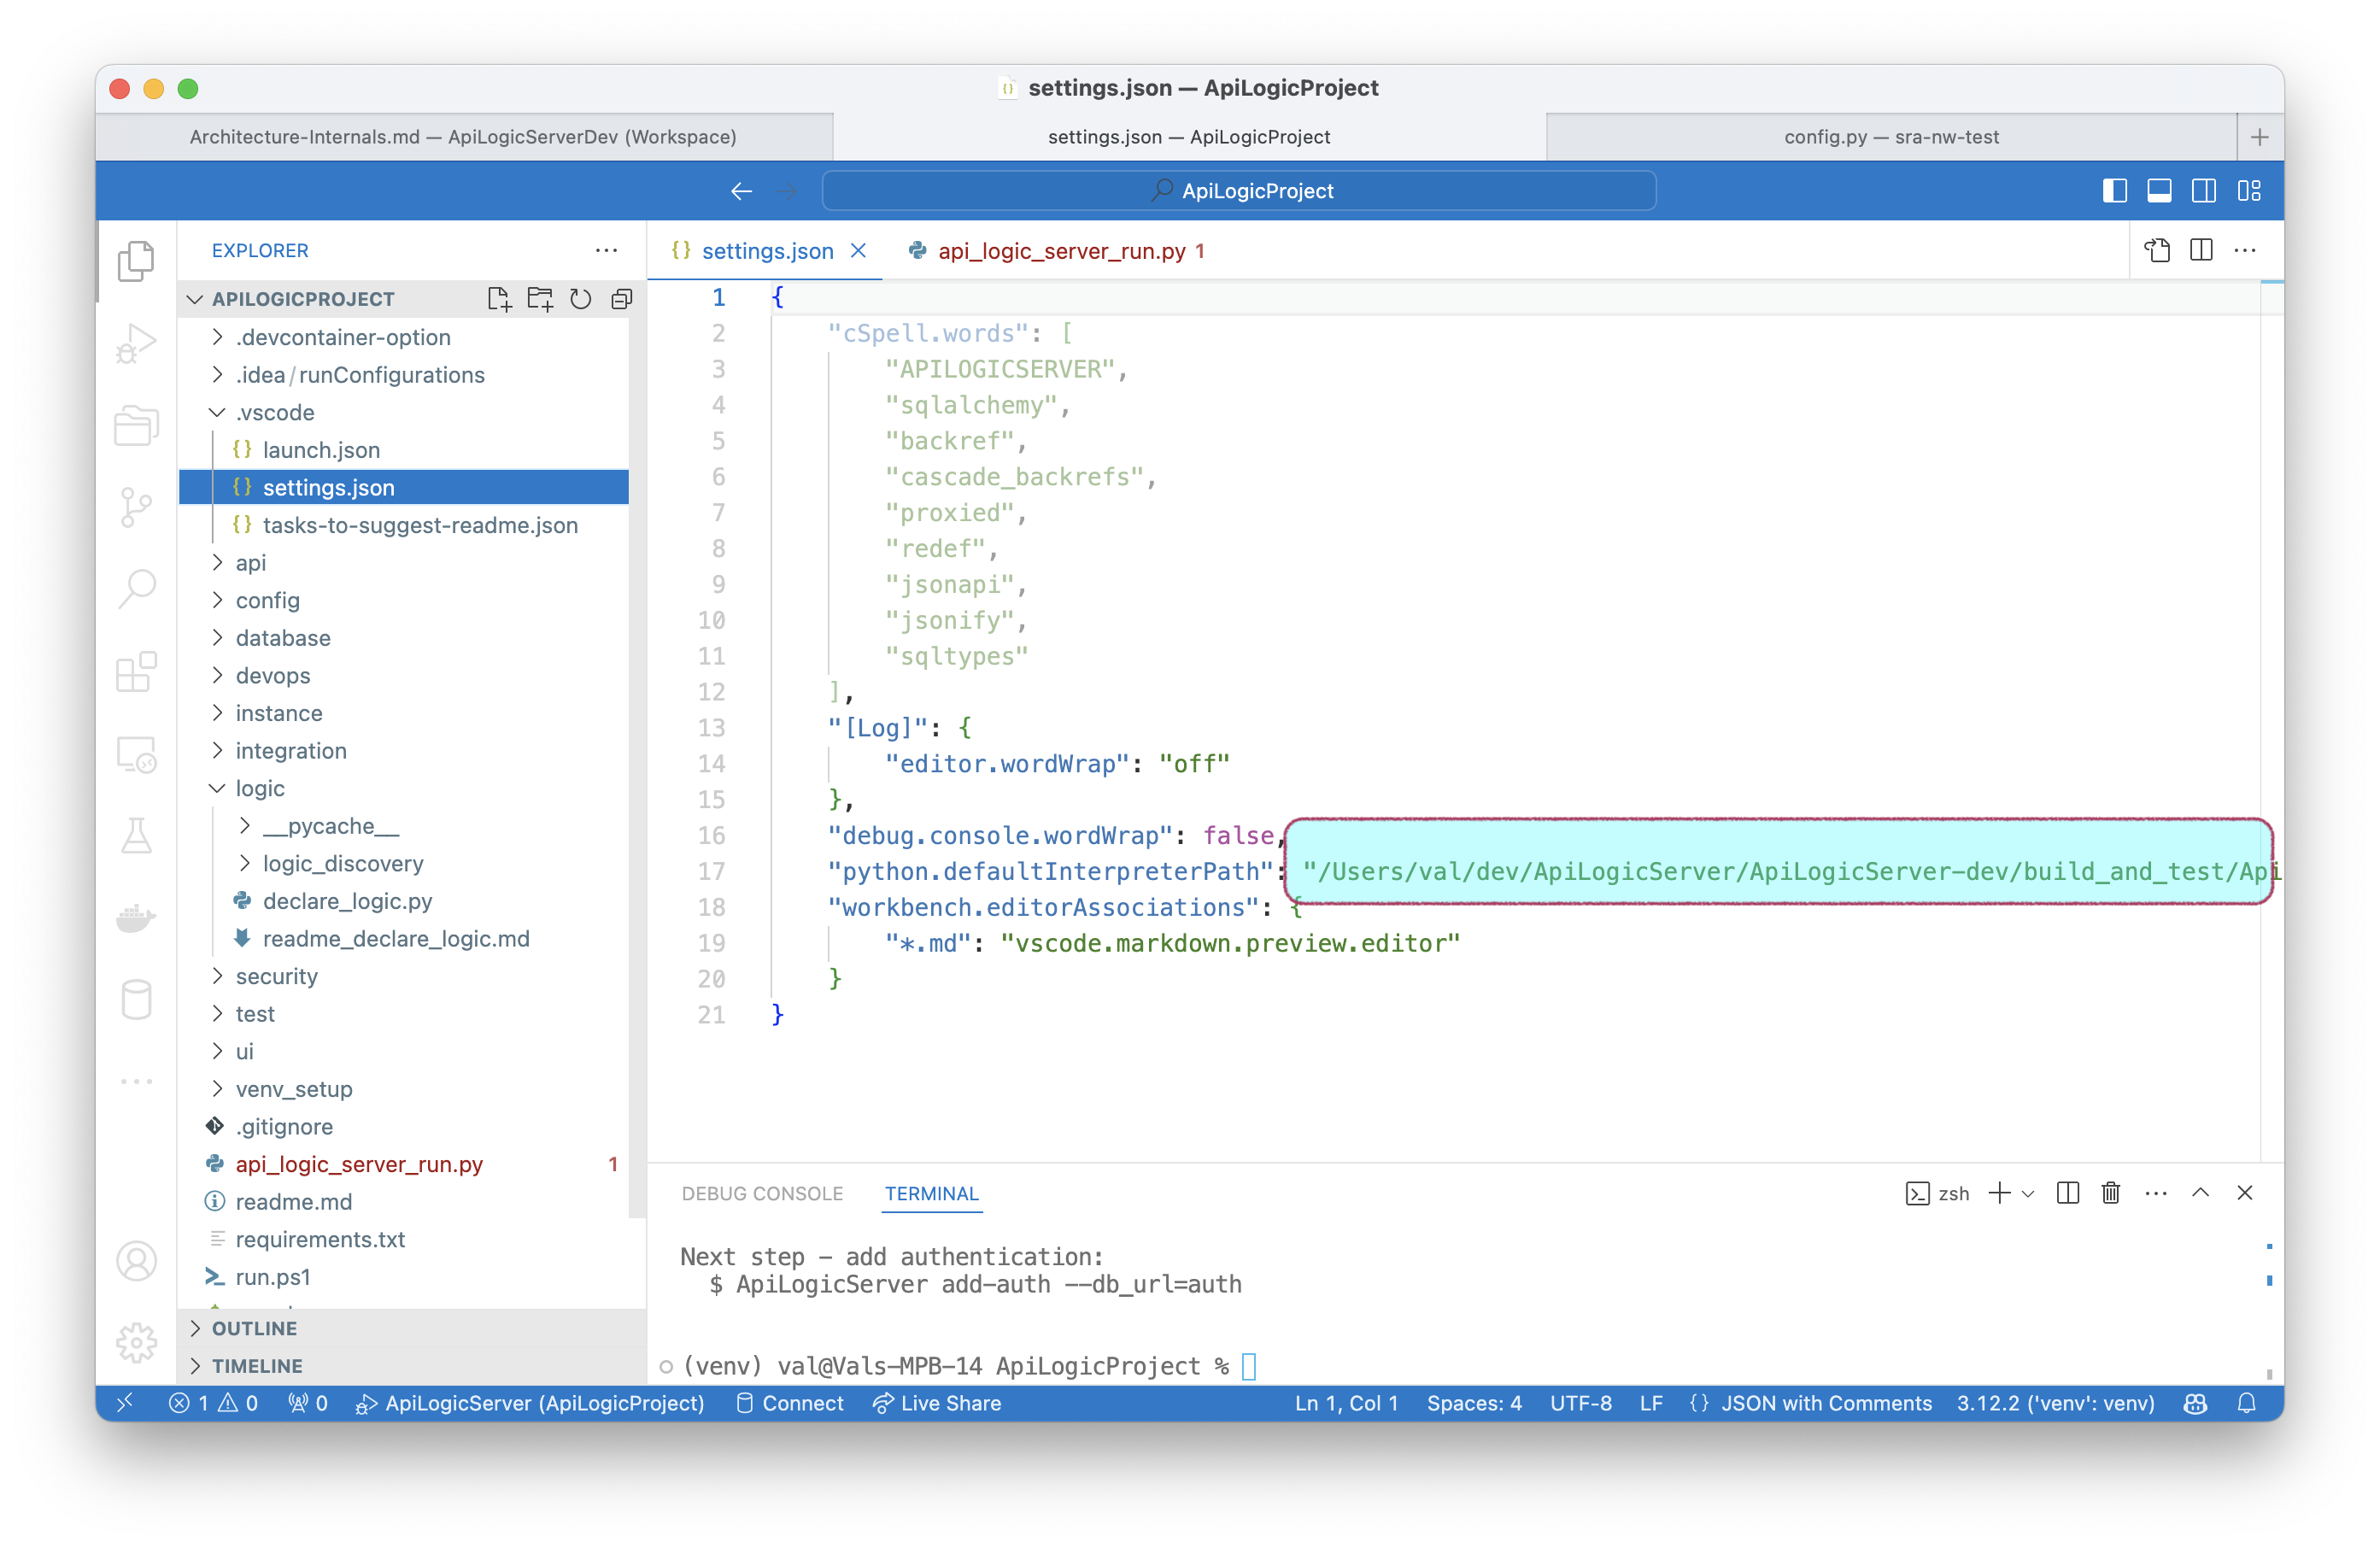
In some cases, you may wish to test using experimental version of underlying packages, such as safrs or logicbank. You can add multiple paths to Python Path like this:
1. Edit ApiLogicServer/.vscode/settings.json to identify the desired packages, e.g.:
If yu have more than one, separate them with colons.
2. With the ApiLogicServer venv active, pip uninstall the packages you want to test
3. Exit the ApiLogicServer workspace, and restart VSCode on the ApiLogicServer folder (not workspace)
4. Use the Run Configs to create/test the app, e.g., 2 - Debug ApiLogicProject
Note: you will need to perform a similar process if you want an installed local version of ApiLogicServer using the
tests/build_and_testprocedure.
This procedure sometimes fails. You can also try adding your package to the `env' in the Run Config:
        {
            "name": "No Security ApiLogicServer (e.g., simpler swagger)",
            "type": "python",
            "request": "launch",
            "program": "api_logic_server_run.py",
            "redirectOutput": true,
            "env": {"PYTHONPATH": "/Users/val/dev/safrs", "SECURITY_ENABLED": "False", "PYTHONHASHSEED": "0", "OPT_LOCKING": "optional", "verbose": "True"},
            "justMyCode": false,
            "args": ["--flask_host=localhost", "--port=5656", "--swagger_host=localhost", "--verbose=False"],
            "console": "internalConsole",
            "internalConsoleOptions": "openOnSessionStart"
        },
Simpler for LogicBank: local install
It's easy to create a local install for LogicBank. First, you need to install the source:
Then, build it and add to the ApiLogicServer venv:
1. Create Logic Bank installer on your hard drive
2. With the ApiLogicServer venv active, pip uninstall LogicBank
3. With the ApiLogicServer venv active, python3 -m pip install ~/dev/LogicBank
Develop / Debug admin app
Once you have created the API Logic Project, you can restart the server like this (it is not necessary to recreate the sample each time you run):
You can obtain an editable version of the admin app like this:
cd ~/dev/safrs-react-admin
git clone https://github.com/thomaxxl/rav3-jsonapi-client # modified data provider used, installed in the project root
Then, to debug (with server running):
npm install --global yarn # required only once
yarn install
yarn run build

yarn start
To make this the runtime used to create API Logic Projects:
cp -a /build/. ../ApiLogicServer/api_logic_server_cli/create_from_model/admin/
Using AI Assistant
If you install the dev source from the manager, you are set up to use the Manager as a dev companion. To bootstrap:
- Please load
.github/.copilot-instructions.md. - Please load
samples/nw_sample/.github/.copilot-instructions.md. - Please load
system/ApiLogicServer-Internal-Dev/copilot-dev-context.md.
Docker Setup
Docker Startup
You can review the dockerfile on github. Note that the normal operation is to start a terminal session as the last step:
When bash sessions are started, Linux runs .bashrc. This checks for environment variables which can be used to load an existing project from git, and run it. (Note: this defeats the normal terminal startup). For example, start Docker using -e arguments, like this:
docker run -it --name api_logic_server --rm --net dev-network \
-p 5656:5656 -p 5002:5002 -v ${PWD}:/localhost \
-e APILOGICSERVER_GIT='https://github.com/valhuber/Tutorial-ApiLogicProject.git' \
-e APILOGICSERVER_FIXUP='/localhost/Project-Fixup.sh' \
apilogicserver/api_logic_server
Alternatively, you can start Docker specifying an initial command, like this:
docker run -it --name api_logic_server --rm --net dev-network \
-p 5656:5656 -p 5002:5002 -v ${PWD}:/localhost \
apilogicserver/api_logic_server \
sh /home/api_logic_server/bin/run-project.sh https://github.com/valhuber/Tutorial-ApiLogicProject.git /localhost/Project-Fixup.sh
In both cases, the git load is performed by bin/run-project.sh, which you can explore on github.
SQL Server testing with VSCode
While Sql/Server itself runs nicely under docker, there is considerable complexity in installing OCBC, regarding pyodbc:
pyodbcis not pip-installed by default, since installs fail unless odbc is installed, which is complex and might not be needed
For users
For users requiring pyodbc (SqlServer), there are 2 installs:
-
ODBC Driver: using
brewas described here -
pip install pyodbc==5.2.00
For ApiLogicServer-dev
ApiLogicServer-dev requirements.txt does not install odbc. If you wish to test Sql/Server in ApiLogicServer-dev, follow the user setup instructions above.
Multi-arch Docker images
Docker creation provides the opportunity to pre-install odbc and simplify life for Sql/Server users. This procedure was used to create apilogicserver/api_logic_server, providing an image that supports odbc, and supports devcontainers for both arm and amd.
# GA release
# docker buildx build --push -f docker/api_logic_server_all.Dockerfile --tag apilogicserver/api_logic_server_all:9.01.17 -o type=image --platform=linux/arm64,linux/amd64 .

# Beta - test codespaces with tutorial, API_Fiddle (change .devcontainer.json -> apilogicserver/api_logic_server_all_x)
# docker buildx build --push -f docker/api_logic_server_all.Dockerfile --tag apilogicserver/api_logic_server_all_x:9.01.17 -o type=image --platform=linux/arm64,linux/amd64 .

# Internal - verify what is done with build_and_test
# docker build -f docker/api_logic_server_all.Dockerfile -t apilogicserver/api_logic_server_local --rm .
Pre-push testing
In our (internal) case, we needed to build multi-arch images, but note the buildx command combines build and push in single procedure. This prevents local testing prior to push. That is why we use the "Internal" docker build, as shown above.
VSC Bug - Run Configs
VSCode has a bug where it cannot parse Run Configs for SqlSvr:
zsh: no matches found: --db_url=mssql+pyodbc://sa:Posey3861@localhost:1433/NORTHWND?driver=ODBC+Driver+18+for+SQL+Server&trusted_connection=no&Encrypt=no
Behave Reports
The doc file Behave-Logic-Report.md is derived from using the behave tests from nw+ (run the test, then create the report).
The report is copied into:
- `api_logic_server_cli/prototypes/base/test/api_logic_server_behave/reports/Behave Logic Report Sample.md'
Behave-Logic-Report.md-- a. Edit the report and remove the path information at the end b. Paste the report intoBehave-Logic-Report.mdover the old contents.
Testing
There are several important testing configurations.
1. ApiLogicServer-dev
To get around the VSC bug, hacks were made to the Run Configs, and the CLI, as described below.
The run config has entries like this:
        {
            "name": "SQL Server nw (bypass vsc bug)",
            "type": "python",
            "request": "launch",
            "cwd": "${workspaceFolder}/api_logic_server_cli",
            "program": "cli.py",
            "redirectOutput": true,
            "argsExpansion": "none",
            "args": ["create",
                "--project_name=../../../servers/sqlsvr_nw",
                "--db_url=sqlsvr-nw"
            ],
            "console": "integratedTerminal"
        },
The CLI detects db_url's like sqlsvr-nw, and converts them to strings like this for Database Connectivity > Docker Databases:
    elif project.db_url == 'sqlsvr-nw':  # work-around - VSCode run config arg parsing
        rtn_abs_db_url = 'mssql+pyodbc://sa:Posey3861@localhost:1433/NORTHWND?driver=ODBC+Driver+18+for+SQL+Server&trusted_connection=no&Encrypt=no'
    elif project.db_url == 'sqlsvr-nw-docker':  # work-around - VSCode run config arg parsing
        rtn_abs_db_url = 'mssql+pyodbc://sa:Posey3861@HOST_IP:1433/NORTHWND?driver=ODBC+Driver+17+for+SQL+Server&trusted_connection=no'
        host_ip = "10.0.0.234"  # ApiLogicServer create  --project_name=/localhost/sqlsvr-nw-docker --db_url=sqlsvr-nw-docker
        if os.getenv('HOST_IP'):
            host_ip = os.getenv('HOST_IP')  # type: ignore # type: str
        rtn_abs_db_url = rtn_abs_db_url.replace("HOST_IP", host_ip)
    elif project.db_url == 'sqlsvr-nw-docker-arm':  # work-around - VSCode run config arg parsing
        rtn_abs_db_url = 'mssql+pyodbc://sa:Posey3861@10.0.0.77:1433/NORTHWND?driver=ODBC+Driver+18+for+SQL+Server&trusted_connection=no&Encrypt=no'
        host_ip = "10.0.0.77"  # ApiLogicServer create  --project_name=/localhost/sqlsvr-nw-docker --db_url=sqlsvr-nw-docker-arm
        if os.getenv('HOST_IP'):
            host_ip = os.getenv('HOST_IP')  # type: ignore # type: str
        rtn_abs_db_url = rtn_abs_db_url.replace("HOST_IP", host_ip)
So, on ApiLogicServer-dev:
- Verify your machine has odbc 18 (using
brew which) - Use Run Config:
SQL Server nw (bypass vsc bug)
2. Local pip install
Note: since the docker image is odbc17, the following commands fail in docker, but run in pip install when you've installed odbc18:
Useful links
As a contributor, you will likely work with: