Keycloak DevNotes
Integration: ApiLogicServer + Keycloak
This repo contains a demo for apilogicserver integration with keycloak oidc JWT authentication. We can now codegen kc-capable apps (though will still required setup as described below).
- kci refers to the running KeyCloakIntegration
Status - 3/10:
- able to access keycloak for login using modified sra at localhost.
- kci is running with authentication & authorization (minimal testing)
- we can now run a generated app, presuming the Iterim Additional Setup
Configuring Security
With your project open, use the Terminal > New Terminal window:
Anticipated Usage
We anticipate that developers will probably
- start with no auth
- just to get running
- then configure sqlite (
als add-auth --provider-type=sql --db-url=)- simplest way to get started with auth - nothing to install or configure
- declare your grants (which is not trivial)
- switching to other sql dbms (e.g,. Postgresql) is now more tricky (doc to follow)
- simplest way to get started with auth - nothing to install or configure
- then configure keycloak (
als add-auth --provider-type=keycloak --db-url=) - often switch back and forth during testing, or for different developers
- It's important this be fast and easy - in particular, just 1 step to reduce errors
System Support
Therefore, as of 10.04.55, several changes faciliate switching between no / sql / keycloak authentication:
-
All projects are created sql auth fully configured for sqlite. This includes the SQLAlchemy models, the api auth endpoints, the database, etc.
- See the screenshot below
- But, auth is initially disabled
- so, user behavior is still no security, just as now
- they then use the
add-authcommand to configure, as described above
-
The auth setting in
ui/admin/admin.yamlis created asauthentication: '{system-default}', and updated on load with the config values (overridden by env settings).- This means you do not have to alter your
admin.yanlwhen you reconfigure auth
- This means you do not have to alter your
-
You can hard-code authentication, eg,
authentication:
  keycloak:
    url: https://kc.hardened.be
    realm: kcals
    clientId: alsclient

Iterim Additional Setup
ApiLogicServer add-auth --provider-type=keycloak --db-url=  # if not already done
cp -r devops/keycloak/nginx/admin-app ui/safrs-react-admin
Or, the entire sequence, using the testpy release (aside - the dev ide has run configs for this under 2. Create servers/ApiLogicProject):
ApiLogicServer create --project-name= --db-url=
code ApiLogicProject  # then, in VSC terminal...
ApiLogicServer add-cust
ApiLogicServer add-auth --provider-type=keycloak --db-url=
cp -r devops/keycloak/nginx/admin-app ui/safrs-react-admin
cd devops/keycloak
docker compose up
# start ApiLogicServer server from the IDE (F5)
Run:
This will run keycloak on the docker host (use admin, password): - keycloak (http://localhost:8080)
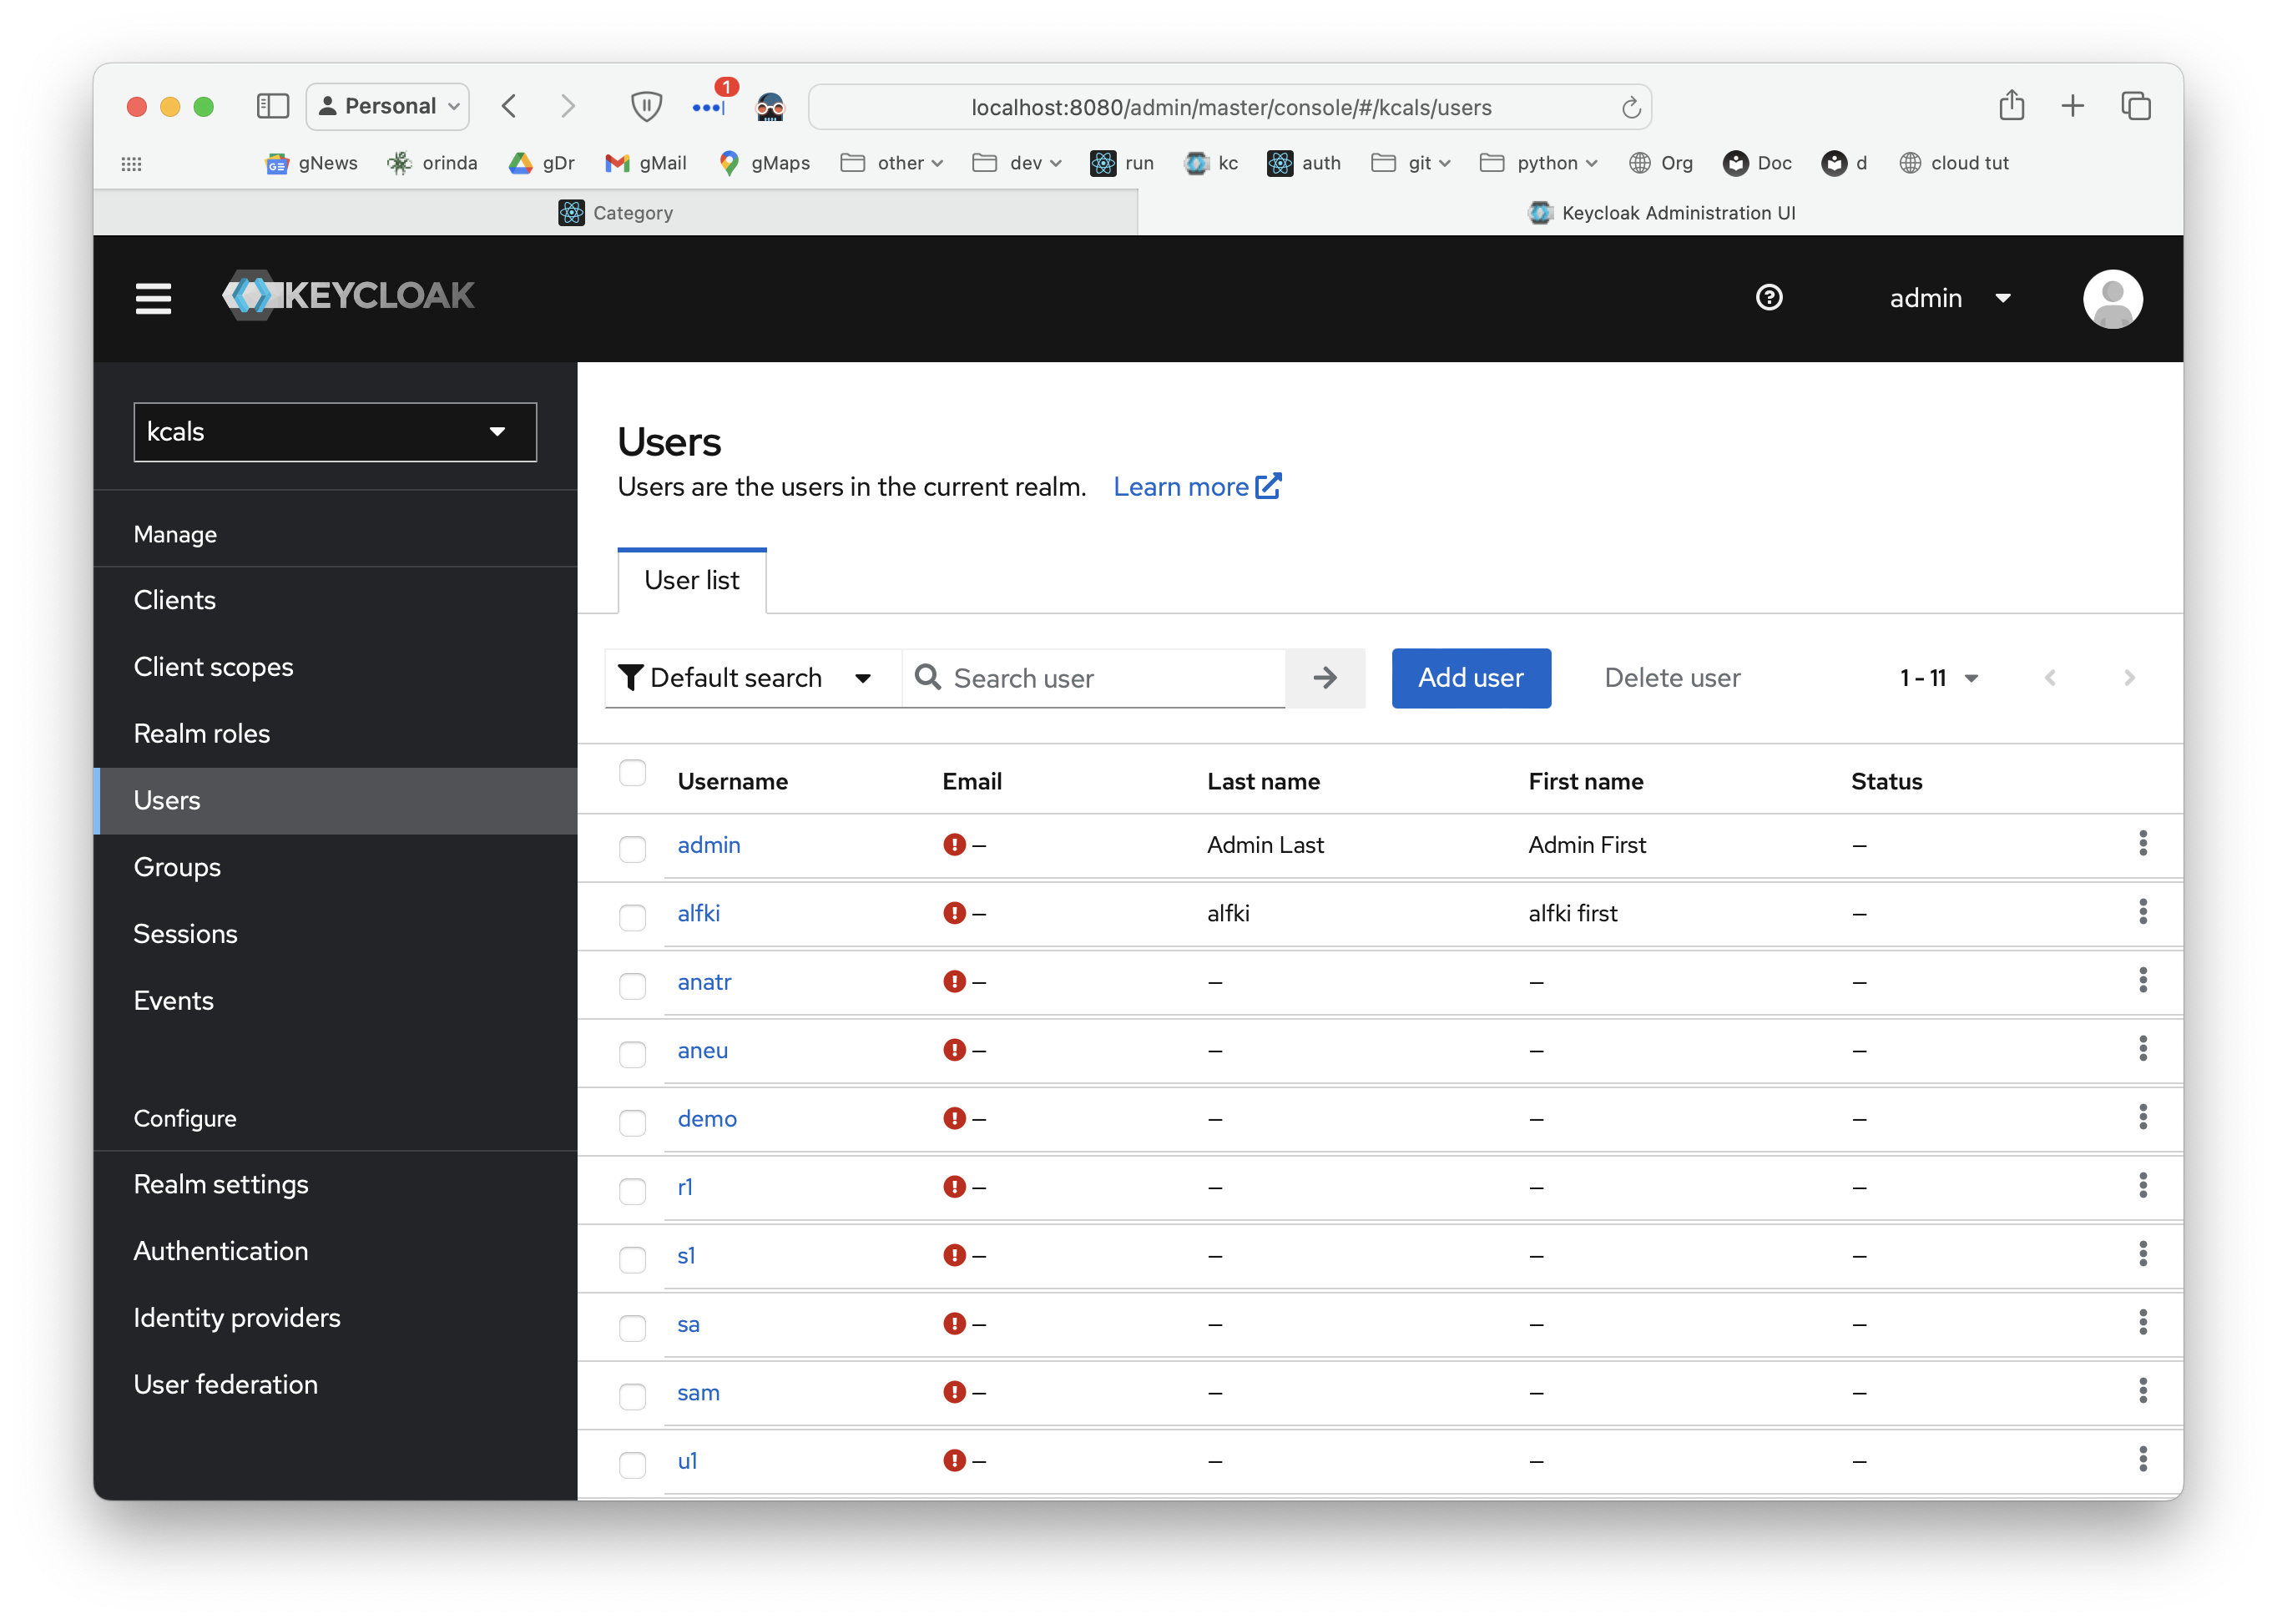
Define Users and Roles
This works - you can define users, and they are available (with their roles) at runtime (see the jwt.io screenshot, below):
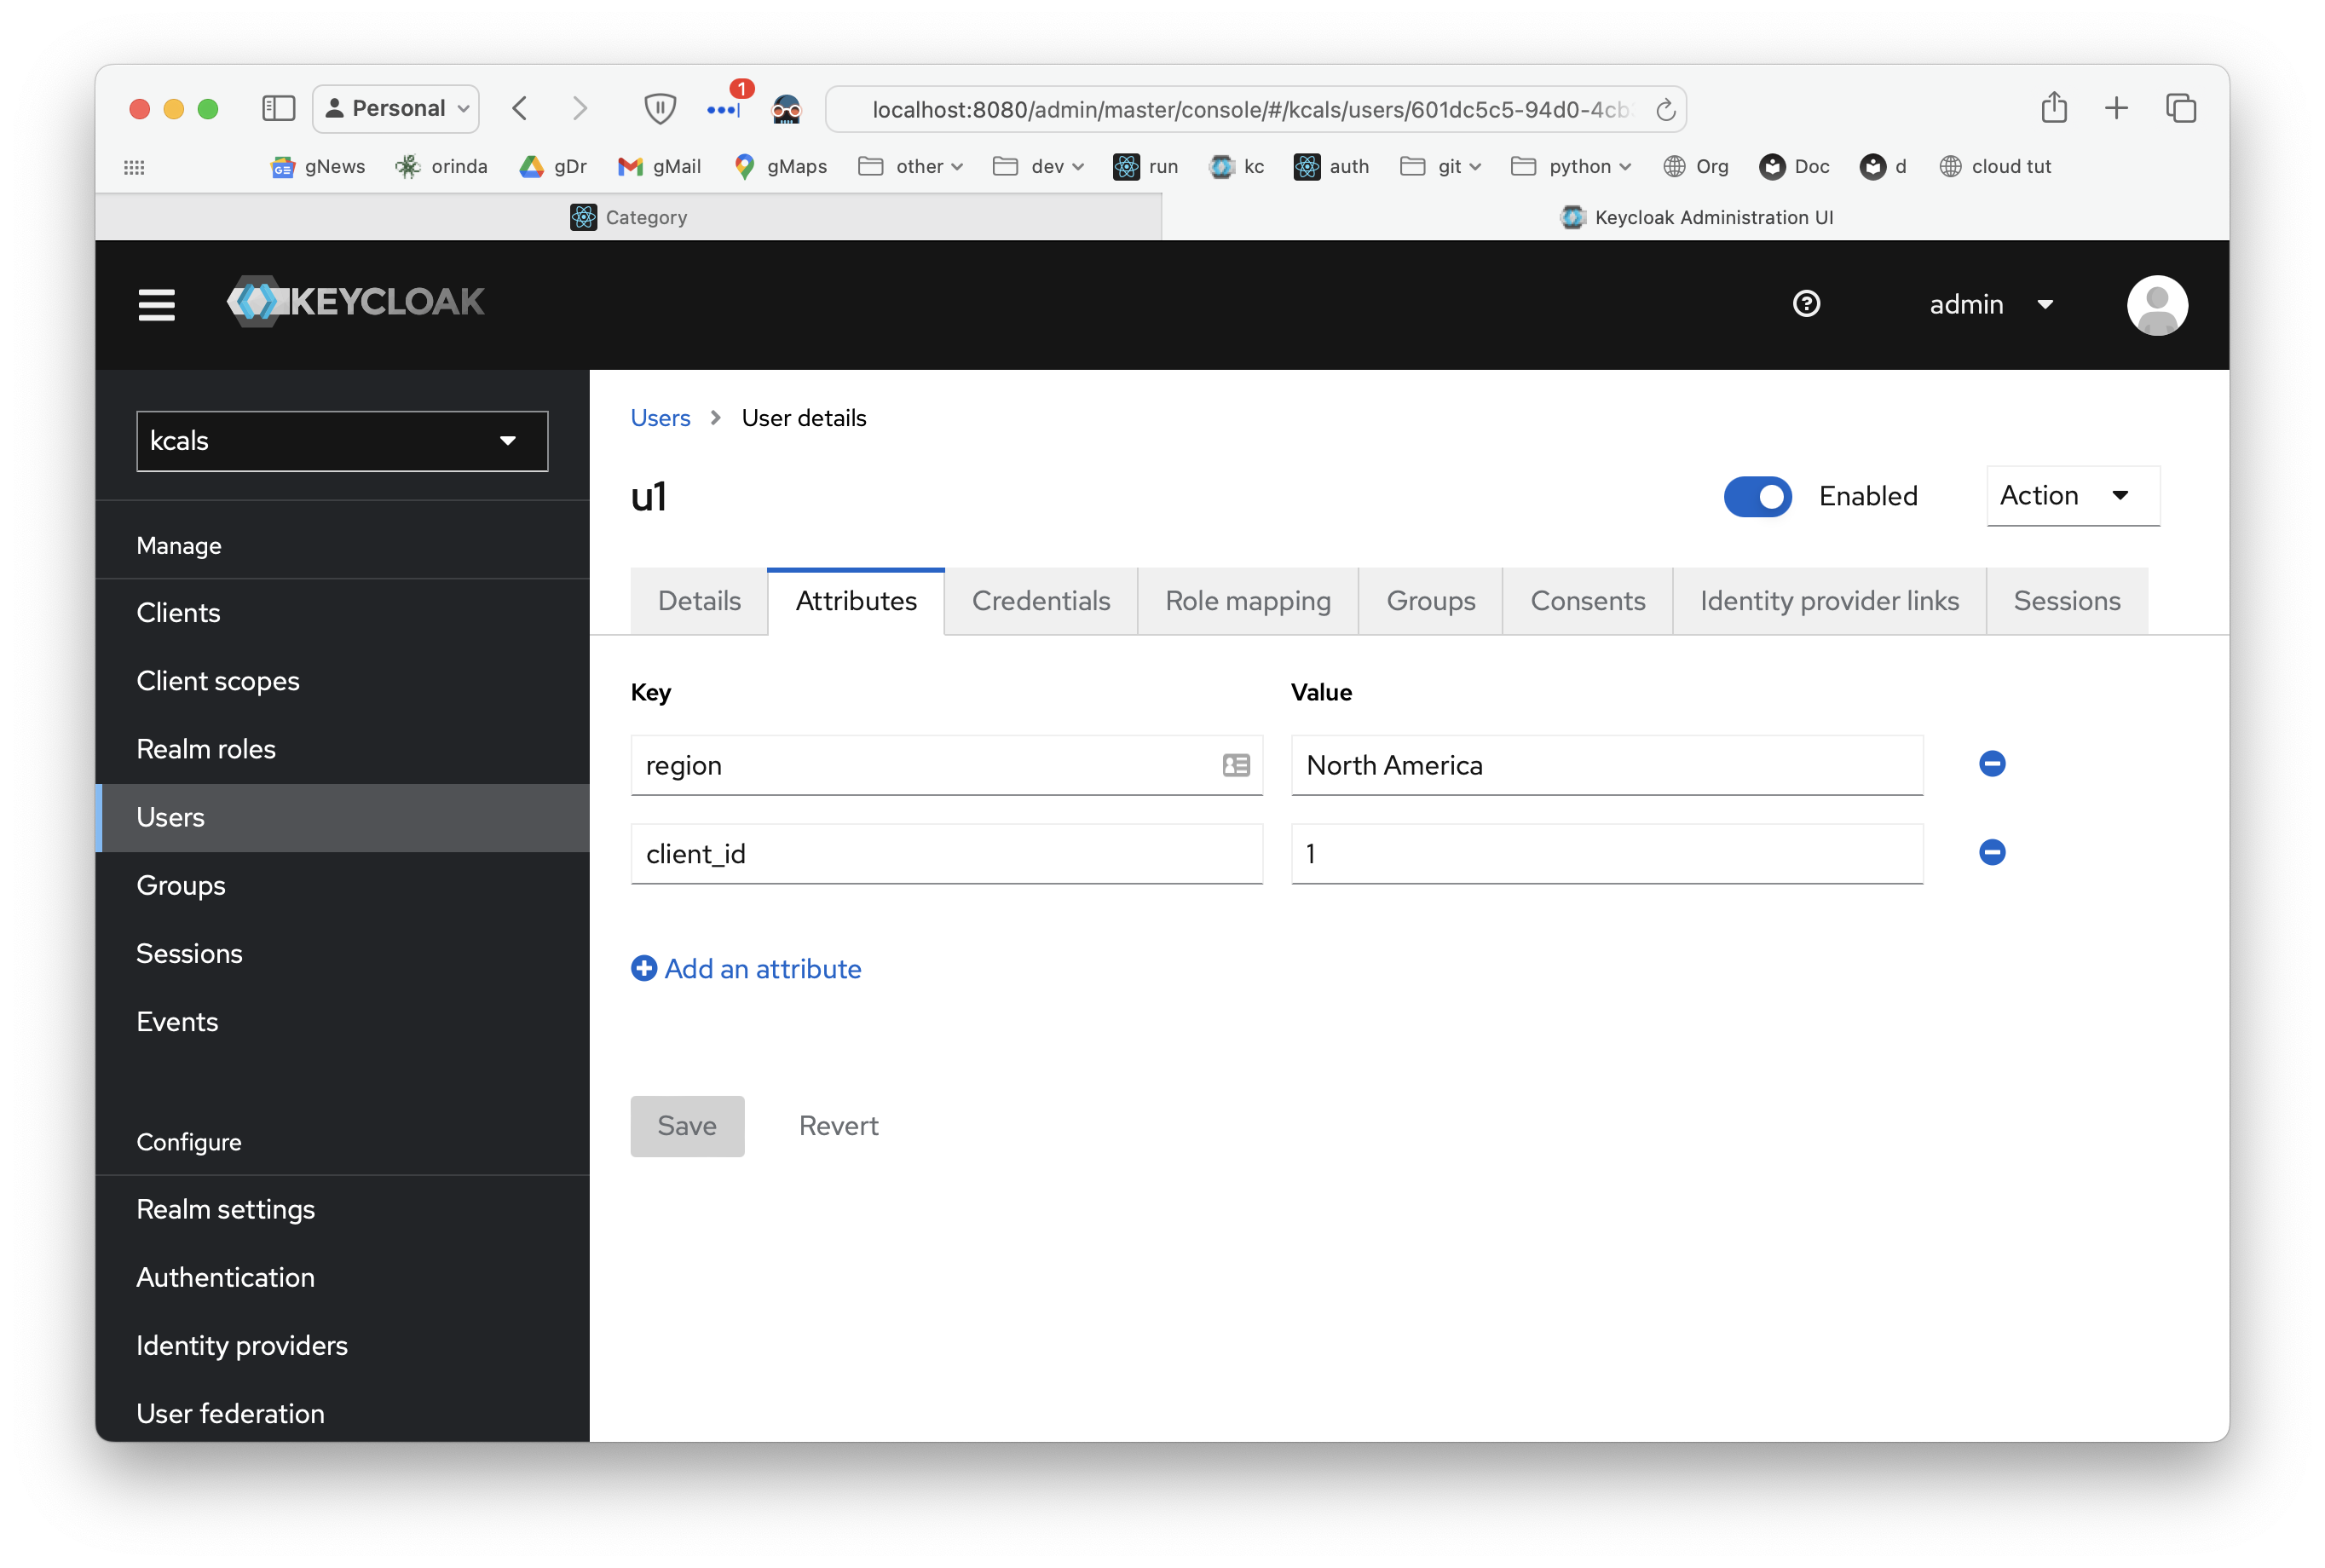
Define Attributes
I can enter User Attributes:
And, using this, register mappers:
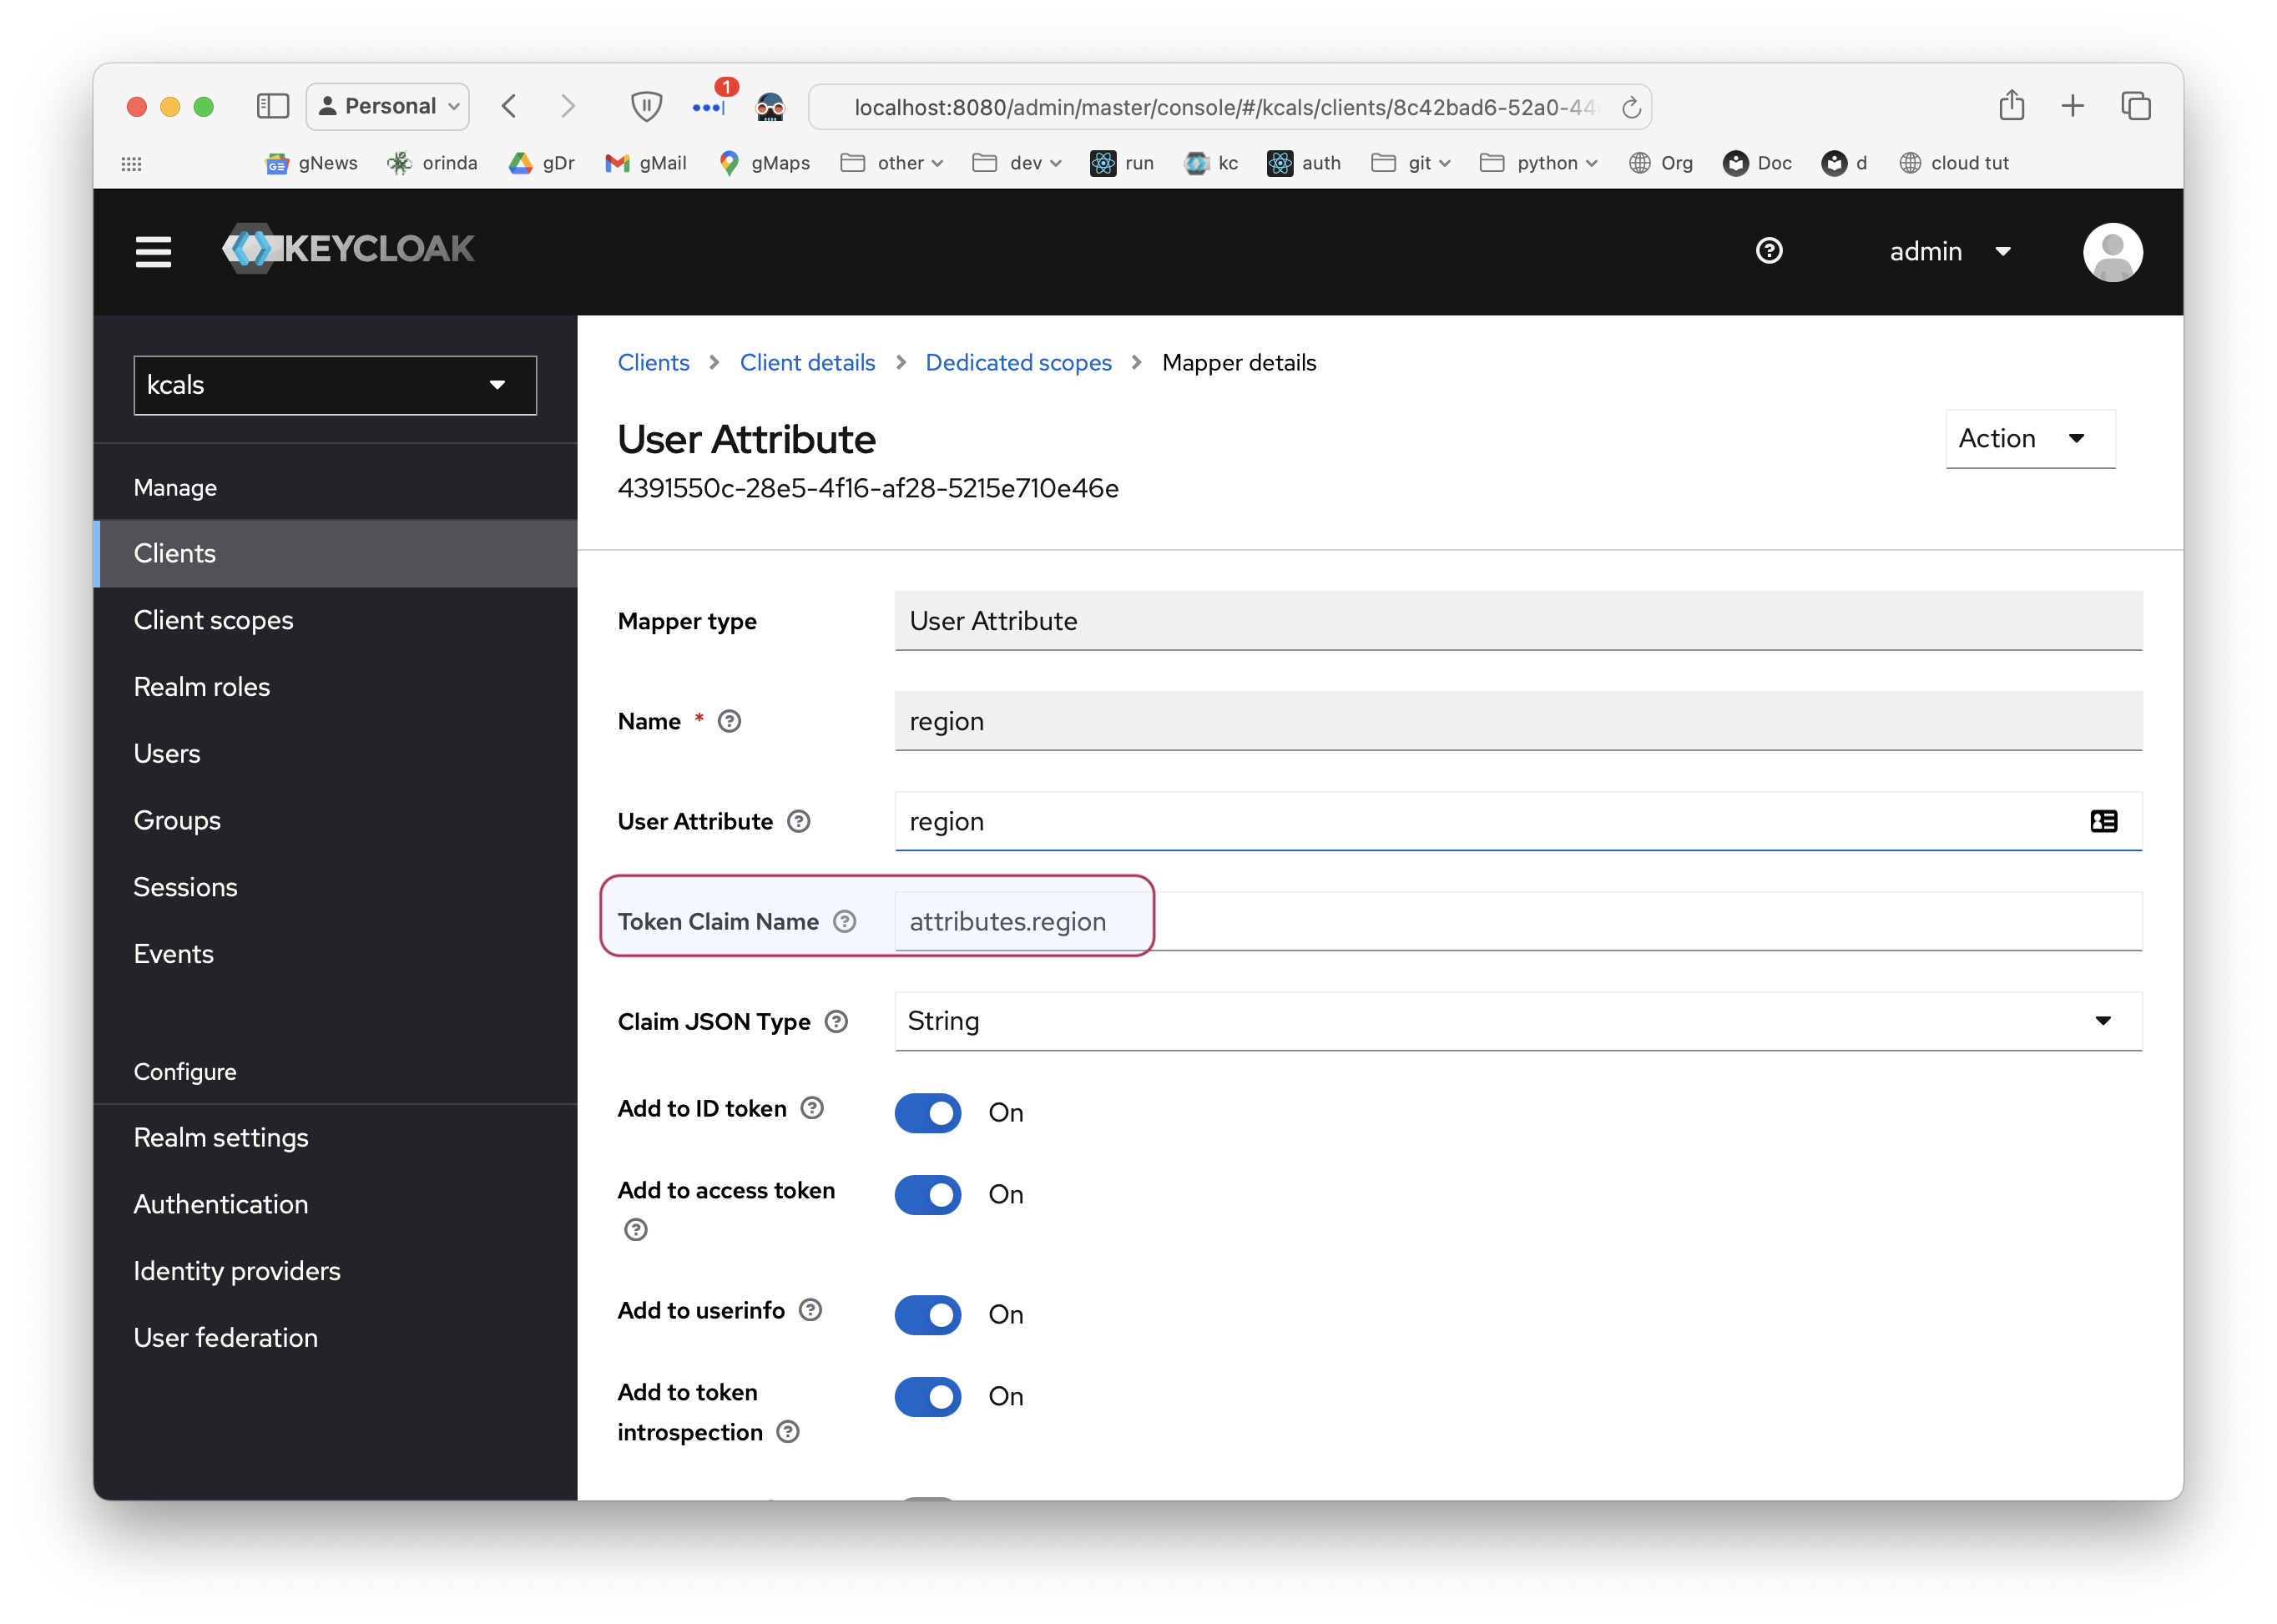
You must provide the Token Claim Name:
Authorization working
Login as u1. Observe you only get 1 category.
Test:
1. Keycloak Login Unit Test
Verify keycloak login with demo, demo
# keycloak realm named "kcals"
KC_BASE=http://localhost:8080/realms/kcals

echo "\n\noidc token endpoint"
TOKEN_ENDPOINT=$(curl ${KC_BASE}/.well-known/openid-configuration | jq -r .token_endpoint)
echo "TOKEN_ENDPOINT: ${TOKEN_ENDPOINT} \n"

echo "retrieve an access token by logging in "
TOKEN=$(curl ${TOKEN_ENDPOINT} -d 'grant_type=password&client_id=alsclient' -d 'username=u1' -d 'password=p' | jq -r .access_token)
echo "TOKEN: ${TOKEN} \n"

# test the authentication
curl http://localhost:5656/api/Category -H "Authorization: Bearer ${TOKEN}" | jq .
2. Start APP Logic Server
Use first Run Config.
- If possible, I'd like to simplify setup, and make debugging easier, so trying to run the app natively.
Adapted Implementation
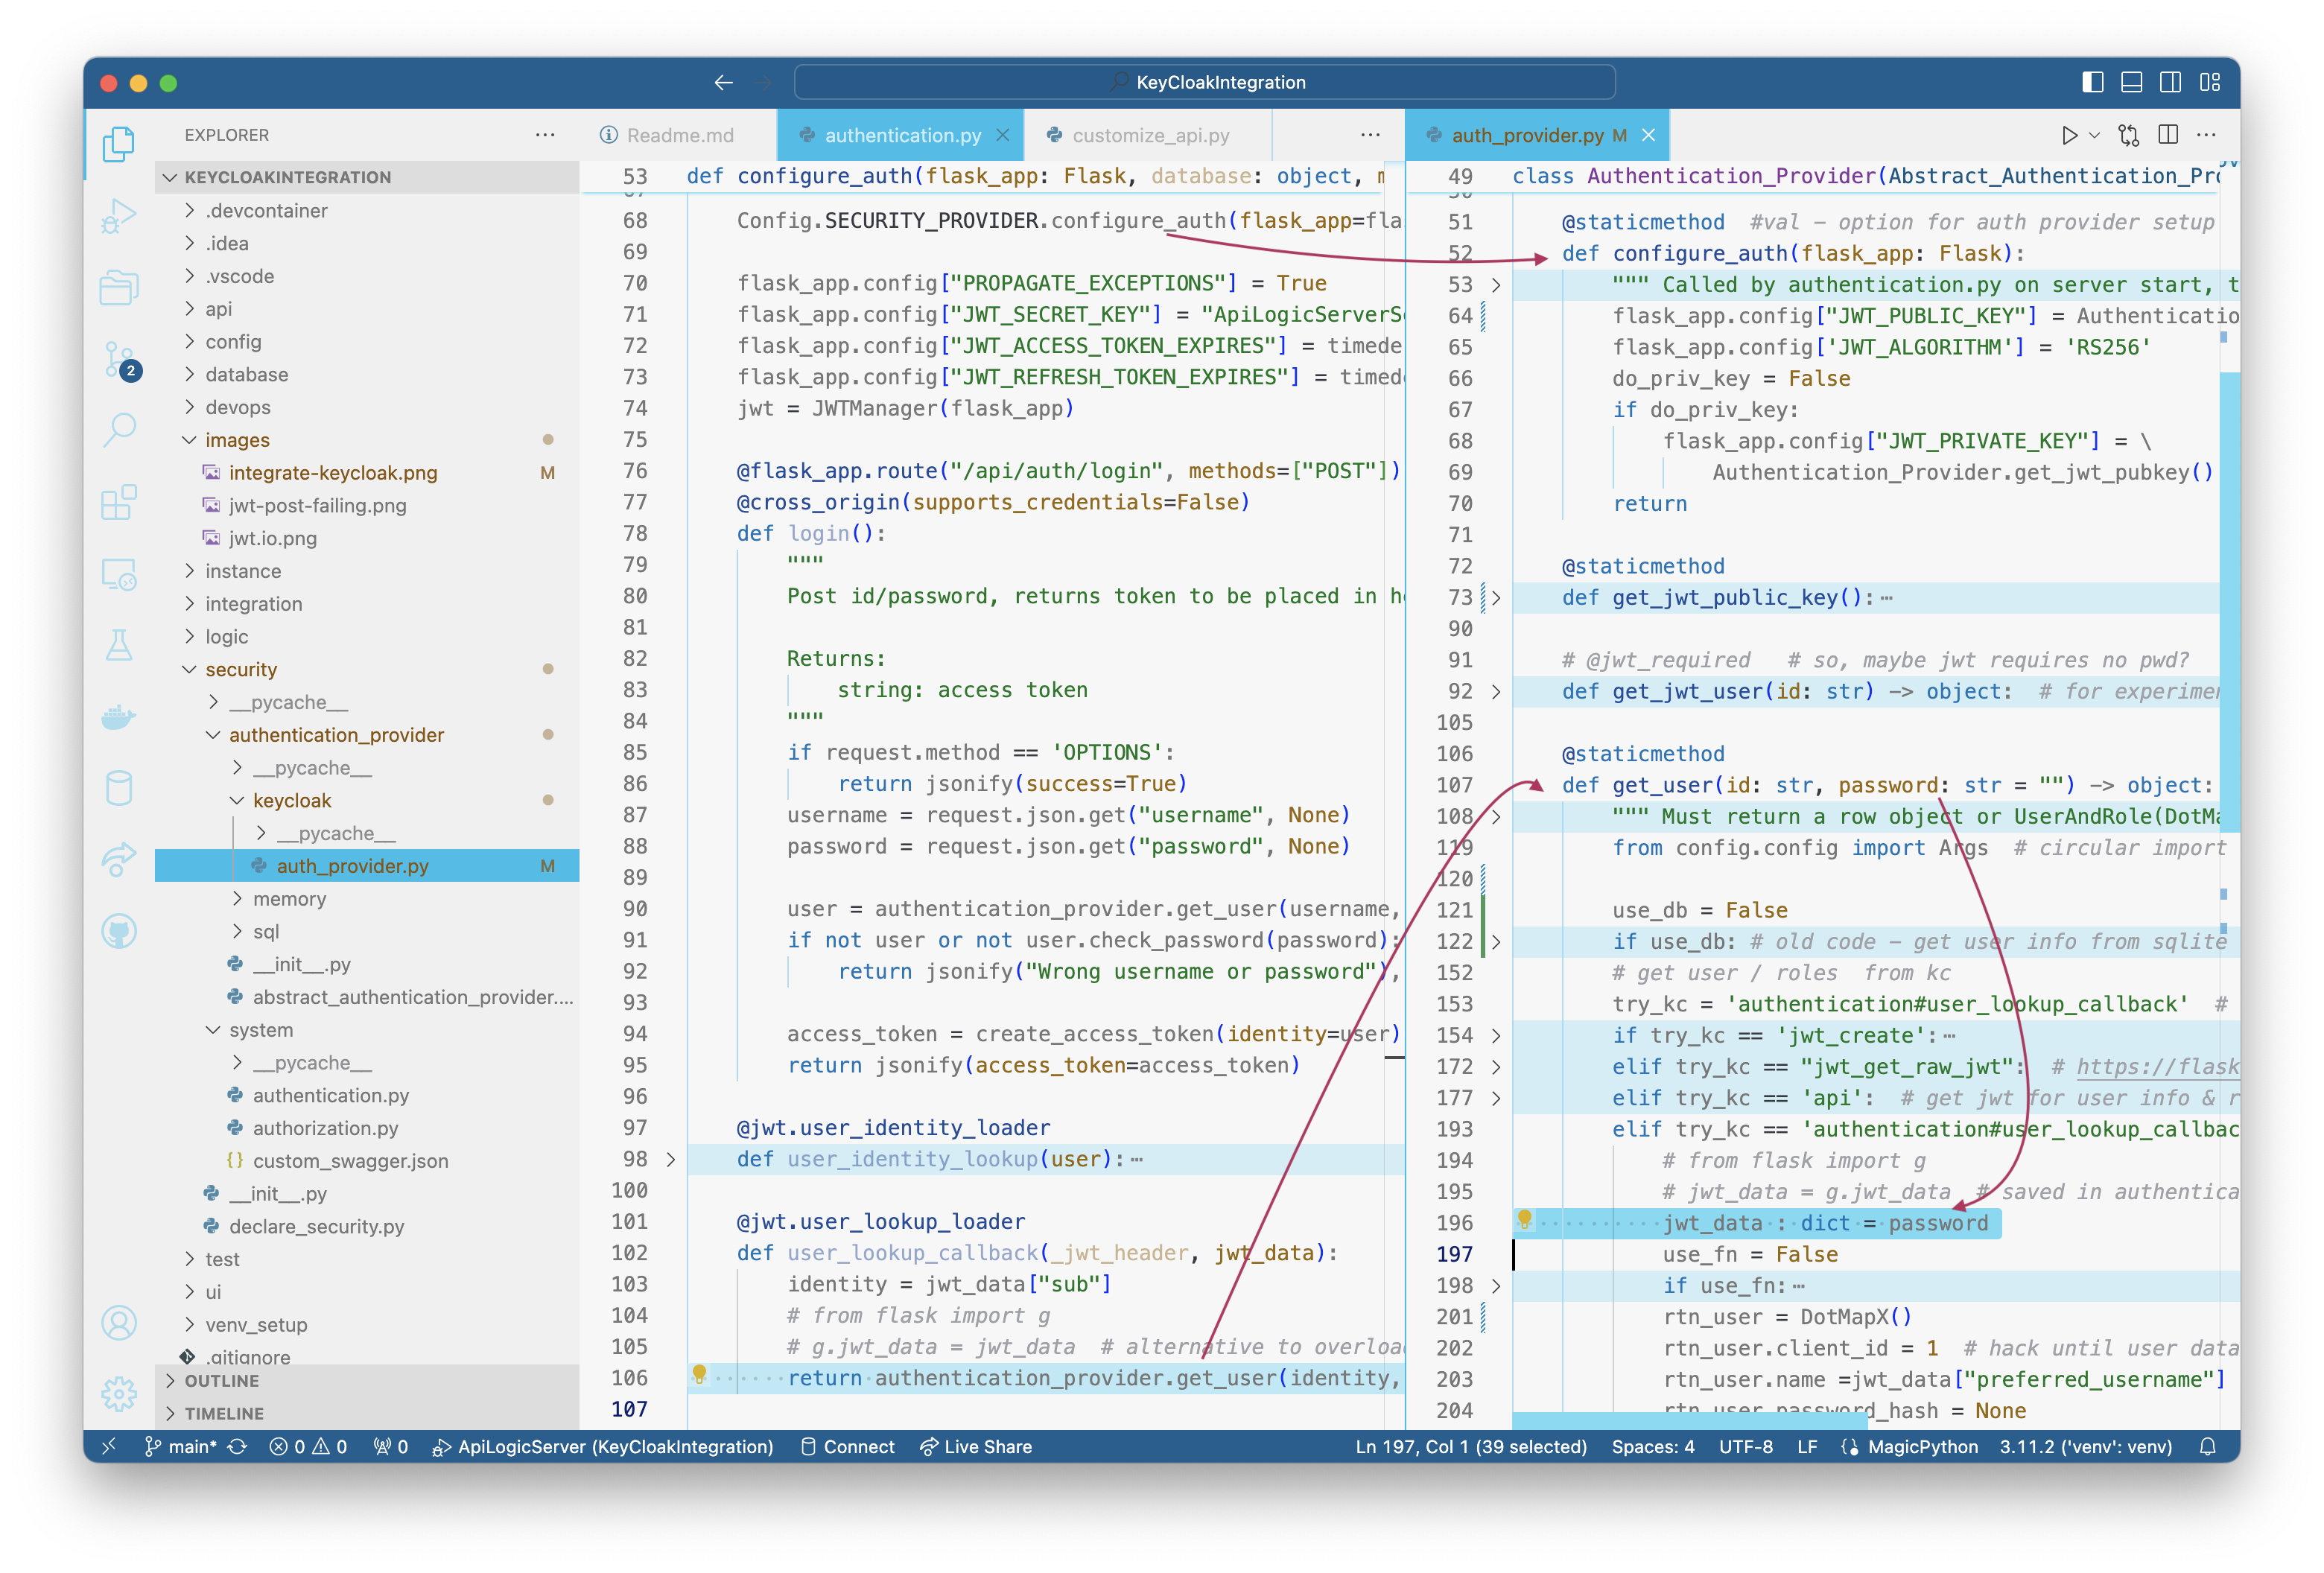
Several changes to adapt the original poc to API Logic Server structure:
- Updated
security/system/authentication.py- Call a new
configure_authfunction in the Keycloak Provider - Pass jwt_data to
get_user(identity, jwt_data)(arg 2, instead of password) - This removes dependency on this file to provider type.
- Call a new
- Introduced
security/authentication_provider/keycloak/auth_provider- Moved the settings and
get_jwt_public_keyto there - This centralizes all the keycloak elements into its provider
- There is a
config/config.pysetting to activate the Keycloak Provider.- This will later be a CLI command.
- Moved the settings and
- Added the docker compose material (including imports) to the
devopsdir - Note interim SRA is included in
ui/safrs-react-admin - To login, see the
Authobject in the admin app: demo, demo
Inspecting Access Tokens
You can use jwt.io:

Initial Implementation (for reference)
- the
$PWD/projectswas mounted at/projectsin the ApiLogicServer container - A project named
KCALSwas created (default nw, with authentication):
mkdir projects
chmod 777 projects # we need to be able to write to this directory from the container
docker run  $PWD/projects:/projects -it apilogicserver/api_logic_server bash -c "ApiLogicServer create --project_name=/projects/KCALS --db_url= ; ApiLogicServer add-auth --project_name=/projects/KCALS"
For users to be able to authenticate with JWTs signed by keycloak, we have to download the JWK signing key from keycloak and use that to validate the JWTs. JWT validation is implemented in https://github.com/thomaxxl/kcals/security/system/authentication.py.
By default, apilogicserver authentication uses a user database. Our users are defined in keycloak however. I had to change auth_provider.py for this to (kinda) work.
React-Admin
Nginx is used to host the safrs-react-admin frontend at http://localhost/admin-app .
Persisting Keycloak Data
keycloak data is stored inside the keycloak container in /opt/keycloak/data . To make this persistent, you should mount this volume. Currently, only the "import" folder is mounted. This import folder contains json files exported by me. These json files are imported when the container starts with the " --import-realm" command line switch ( https://www.keycloak.org/server/importExport )
You can try this:
$ mkdir data
$ mv import data # the import folder containing the json files
$ chmod 777 data # make sure the container keycloak user can write to this folder
Then, change the docker-compose keycloak volumes to:
volumes:
    - $PWD/data:/opt/keycloak/data
Finally, update the docker-compose file so that the imports don't overwrite the mounted volume settings:
- Remove the
--import-realm - Remove
- $PWD/import:/opt/keycloak/data/import
This way, the /opt/keycloak/data will remain on the docker host mounted directory ($PWD/data).
Access data - this does not appear to work (no cli):
Export the data
docker exec -it keycloak bash
$ cd /opt/keycloak
$ bin/kc.sh export --help
$ bin/kc.sh export --dir export
$ exit
docker cp keycloak:/opt/keycloak/export ~/Desktop/keycloak-export
Notes: Accessing the jwt at runtime
To retrieve user info from the jwt, you may want to look into these functions: https://flask-jwt-extended.readthedocs.io/en/stable/automatic_user_loading.html as used in security/system/authentication.py
Saved snippet
Aside - can use this as bearer... jwt.io will decode it
data = {
            "grant_type": "password",
            "client_id": "alsclient",
            "username" :f"{username}",
            "password": f"{password}"
        }
        resp = requests.post(f"{TOKEN_ENDPOINT}", data)
        if resp.status_code == 200:
            resp_data = json.loads(resp.text)
            access_token = resp_data["access_token"]
            return jsonify(access_token=access_token)