Sample Integration
 TL;DR - Kafka Integration: Async Messaging
APIs are useful to application integration, but do not deal with the reality that the receiving system might be down.
Message Brokers like Kafka address this with guaranteed async delivery of messages. The Broker stores the message, delivering it (possibly later) when the the receiver is up.
Message Brokers also support multi-cast: you publish a message to a "topic", and other systems subscribe. This is often casually described as "pub/sub".
This sample presumes you are familiar with basic GenAI-Logic services, as illustrated in the Basic Demo tutorial.
This guide will illustrate how to publish Kafka messages, and subscribe to and process them in another project. This all runs on your machine, and includes instructions in installing Kafka as a Docker container.
Purpose
System Requirements
This app illustrates using IntegrationServices for B2B push-style integrations with APIs, and internal integration with messages.

The demo_kafka API Logic Server provides APIs and logic:
-
Order Logic: enforcing database integrity and application Integration (alert shipping)
-
A Custom API, to match an agreed-upon format for B2B partners
-
Standard APIs for ad-hoc integration, user interfaces, etc
The Shipping API Logic Server listens on kafka, and processes the message.
Self-serve APIs, Shared Logic
This sample illustrates some key architectural considerations:
| Requirement | Poor Practice | Good Practice | Best Practice | Ideal |
|---|---|---|---|---|
| Ad Hoc Integration | ETL | APIs | Self-Serve APIs | Automated Self-Serve APIs |
| Logic | Logic in UI | Reusable Logic | Declarative Rules .. Extensible with Python |
|
| Messages | Kafka | Kafka Logic Integration |
We'll further expand of these topics as we build the system, but we note some Best Practices:
-
APIs should be self-serve: not requiring continuing server development
- APIs avoid the overhead of nightly Extract, Transfer and Load (ETL)
-
Logic should be re-used over the UI and API transaction sources
- Logic in UI controls is undesirable, since it cannot be shared with APIs and messages
This sample was developed with API Logic Server - open source, available here.
Please load `.github/.copilot-instructions.md`
Development Overview
1. Create Project
The command below creates an demo_kafka by reading your schema. The database is Northwind (Customer, Orders, Items and Product), as shown in the Appendix.
Notes:
- If you are in the project
demo_kafka, this is already done -- ignore this step - the
db_urlvalue is an abbreviation; you would normally supply a SQLAlchemy URL.
You can then open the project in your IDE, and run it.
2. Customize: in your IDE
While API/UI automation is a great start, we now require Custom APIs, Logic and Security.
a. Using Copilot (experimental)
on Placing Orders, Check Credit
    1. The Customer's balance is less than the credit limit
    2. The Customer's balance is the sum of the Order amount_total where date_shipped is null
    3. The Order's amount_total is the sum of the Item amount
    4. The Item amount is the quantity * unit_price
    5. The Item unit_price is copied from the Product unit_price

Use case: App Integration
    1. Publish the Order to Kafka topic 'order_shipping' if the date_shipped is not None.
b. Using add-cust
You normally apply such customizations using your IDE, leveraging code completion, etc. To accelerate this sample, you can apply the customizations with ApiLogicServer add-cust. We'll review the customizations below.
The following add-cust process simulates:
- Adding security to your project using a CLI command, and
-
Using your IDE to:
- declare logic in
logic/declare_logic.sh - declare security in
security/declare_security.py - implement custom APIs in
api/customize_api.py, usingOrderShippingdeclared inintegration/row_dict_maps
- declare logic in
These customizations are shown in the screenshots below.
To apply customizations, in a terminal window for your project:
1. Stop the Server (Red Stop button, or Shift-F5 -- see Appendix)
2. Apply Customizations:
Do not 'add-auth` - it is not required for this demo
3. Enable and Start Kafka
To enable Kafka:
-
In
conf/config.py, find and comment out:KAFKA_PRODUCER = None # comment out to enable Kafka -
Update your
etc/confto include the lines shown below (e.g.,sudo nano /etc/hosts).
##
# Host Database
#
# localhost is used to configure the loopback interface
# when the system is booting.  Do not change this entry.
##

# for kafka
127.0.0.1       broker1
::1             localhost
255.255.255.255 broadcasthost
::1             localhost

127.0.0.1       localhost
# Added by Docker Desktop
# To allow the same kube context to work on the host and the container:
127.0.0.1 kubernetes.docker.internal
# End of section
1. Start it in the Docker Desktop, and
2. **Skip the next 2 steps;** otherwise...
-
Start Kafka: in a terminal window:
docker compose -f integration/kafka/dockercompose_start_kafka.yml up -
Create topic: in Docker:
docker exec -it broker1 bash # then, in the docker shell
/opt/kafka/bin/kafka-topics.sh --create --bootstrap-server localhost:9092 --replication-factor 1 --partitions 3  --topic order_shipping
Here some useful Kafka commands:
# use Docker Desktop > exec, or docker exec -it broker1 bash
# in docker terminal: set prompt, delete, create, monnitor topic, list all topics
# to clear topic, delete and create

PS1="kafka > "  # set prompt

/opt/kafka/bin/kafka-topics.sh --bootstrap-server localhost:9092 --topic order_shipping --delete

/opt/kafka/bin/kafka-topics.sh --create --bootstrap-server localhost:9092 --replication-factor 1 --partitions 3  --topic order_shipping

# list the msgs - note: you need to increment the group# at the end each time you issue the command
/opt/kafka/bin/kafka-console-consumer.sh --bootstrap-server localhost:9092 --topic order_shipping --from-beginning --group fresh-group-1

/opt/kafka/bin/kafka-topics.sh --bootstrap-server localhost:9092 --list
- Enable Kafka - update
config/default.envto include:
4. Restart the server, login as admin
3. Integrate: B2B and Shipping
We now have a running system - an API, logic, security, and a UI. Now we must integrate with:
- B2B partners -- we'll create a B2B Custom Resource
- OrderShipping -- we add logic to Send an OrderShipping Message
B2B Custom Resource
As illustrated in the Basic Demo tutorial, the add-cust procedure has added a B2B custom endpoint to add an order and items.
EAI Message
Alternatively, we might receive a message from sales using Kafka. We can subscribe as follows:
Subscribe to Kafka topic `order_b2b` (JSON format).

The payload is a single order with items:
{
  "AccountId": "ALFKI",
  "Given": "Steven",
  "Surname": "Buchanan",
  "Items": [
    { "ProductName": "Chai",  "QuantityOrdered": 1 },
    { "ProductName": "Chang", "QuantityOrdered": 2 }
  ]
}

Target tables: Order, OrderDetail (from models.py).

Field mappings:
- `AccountId` → look up Customer by Customer.Id, set Order.CustomerId
- `Given` + `Surname` → compound lookup on Employee.FirstName + Employee.LastName, set Order.EmployeeId
- `Items` array → OrderDetail rows: `ProductName` → look up Product by Product.ProductName, set OrderDetail.ProductId; `QuantityOrdered` → OrderDetail.Quantity
Produce OrderShipping Message
Successful orders need to be sent to Shipping, again in a predesignated format.
To place an order, and send the message:
- Use the Admin App, ServicesEndPoint / OrderB2B
- Click Try It
- Click Execute to use the sample data
We could certainly POST an API, but Messaging (here, Kafka) provides significant advantages:
- Async: Our system will not be impacted if the Shipping system is down. Kafka will save the message, and deliver it when Shipping is back up.
- Multi-cast: We can send a message that multiple systems (e.g., Accounting) can consume.
The content of the message is a JSON string, just like an API.
Just as you can customize apis, you can complement rule-based logic using Python events:
-
Declare the mapping -- see the
OrderShippingclass in the right pane. This formats our Kafka message content in the format agreed upon with Shipping. -
Define a Python
after_flushevent, which invokessend_order_to_shipping. This is called by the logic engine, which passes the SQLAlchemy `models.Order`` row. -
send_order_to_shippinguses theOrderShippingclass, which maps our SQLAlchemy order row to a dict (row_to_dict).

Extensible Rules, Kafka Message Produced
Rule-based logic is extensible with Python, here producing a Kafka message with 20 lines of code.
4. Consuming Messages
The Shipping system illustrates how to consume messages. This system was created from AI, here customized to add message consumption.
Create/Start Shipping
To explore Shipping:
1. Create the Shipping Project:
2. Start your IDE (e.g., code shipping) and establish your venv
3. Start the Shipping Server: F5 (it's configured to use a different port)
Consuming Logic
To consume messages:
1. Enable Consumption
Shipping is pre-configured to enable message consumption with a setting in conf/config.py:
KAFKA_CONSUMER = '{"bootstrap.servers": "localhost:9092", "group.id": "als-default-group1", "auto.offset.reset":"smallest"}'
When the server is started in api_logic_server_run.py, it invokes integration/kafka/kafka_consumer.py#flask_consumer. This calls the pre-supplied FlaskKafka, which takes care of the Kafka listening, thread management, and the handle annotation used below.
FlaskKafkawas inspired by the work of Nimrod (Kevin) Maina, in this project. Many thanks!
2. Configure a mapping
As we did for our OrderB2B Custom Resource, we configure an OrderToShip mapping class to map the message onto our SQLAlchemy Order object.
3. Provide a Message Handler
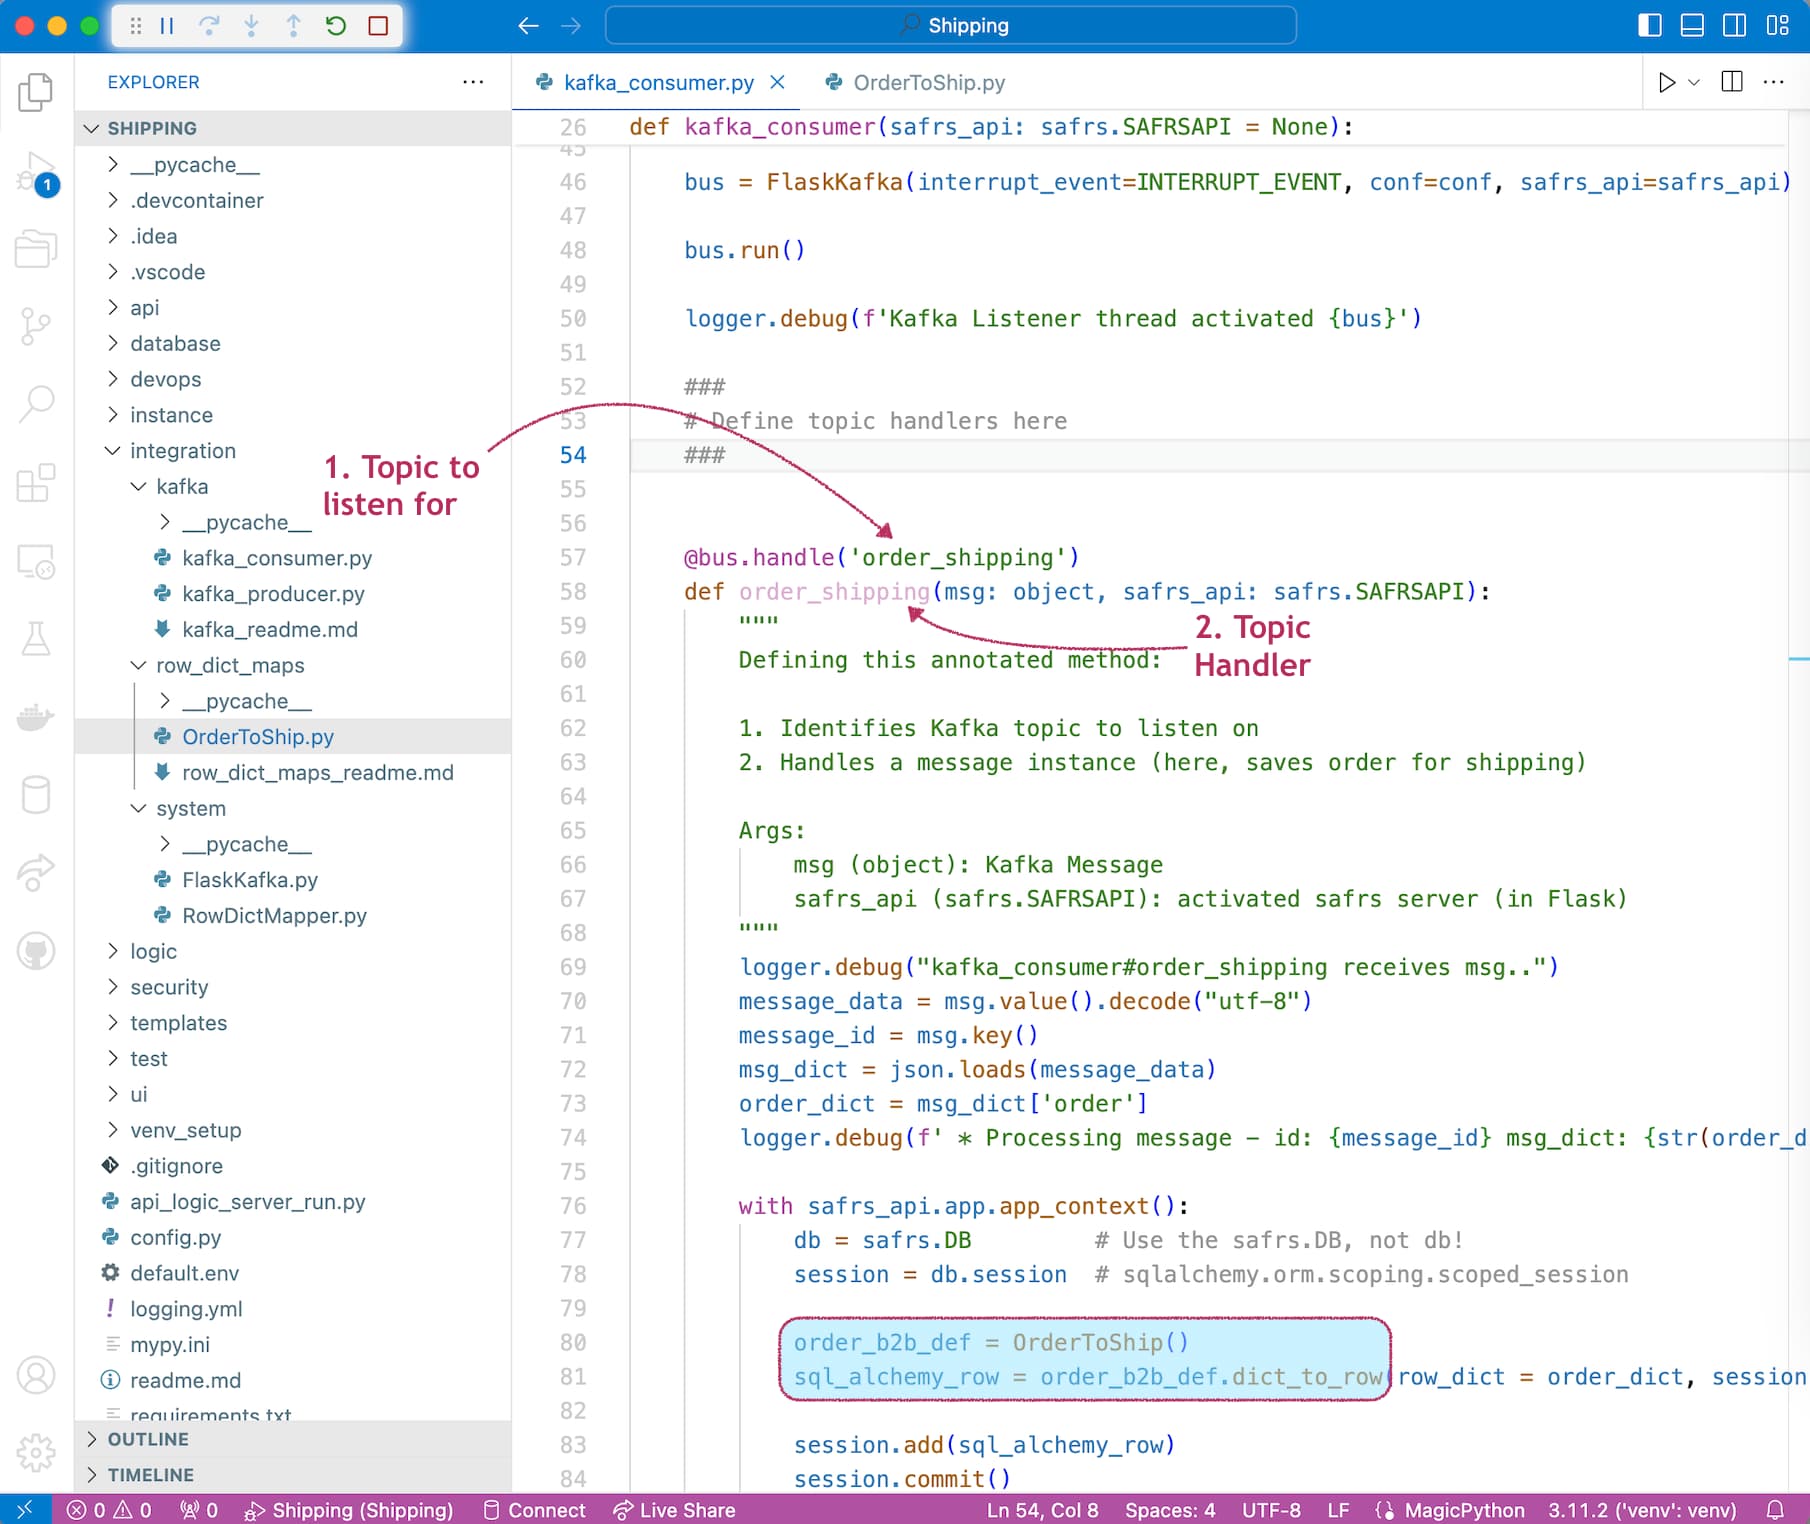
We provide the order_shipping handler in integration/kafka/kafka_consumer.py:
-
Annotate the topic handler method, providing the topic name.
- This is used by
FlaskKafkaestablish a Kafka listener
- This is used by
-
Provide the topic handler code, leveraging the mapper noted above. It is called by
Flaskkafkaper the method annotations.
Test it
Use your IDE terminal window to simulate a business partner posting a B2BOrder. You can set breakpoints in the code described above to explore system operation.
ApiLogicServer curl "'POST' 'http://localhost:5656/api/ServicesEndPoint/OrderB2B'" --data '
{"meta": {"args": {"order": {
    "AccountId": "ALFKI",
    "Surname": "Buchanan",
    "Given": "Steven",
    "Items": [
        {
        "ProductName": "Chai",
        "QuantityOrdered": 1
        },
        {
        "ProductName": "Chang",
        "QuantityOrdered": 2
        }
        ]
    }
}}}'
Summary
These applications have demonstrated several types of application integration:
-
Ad Hoc Integration via self-serve APIs
-
Custom Integration via custom APIs, to support business agreements with B2B partners
-
Message-Based Integration to decouple internal systems by reducing dependencies that all systems must always be running
We have also illustrated several technologies noted in the Ideal column:
| Requirement | Poor Practice | Good Practice | Best Practice | Ideal |
|---|---|---|---|---|
| Ad Hoc Integration | ETL | APIs | Self-Serve APIs | Automated Self-Serve APIs |
| Logic | Logic in UI | Reusable Logic | Declarative Rules .. Extensible with Python |
|
| Messages | Kafka | Kafka Logic Integration |
API Logic Server supports the Ideal Practices noted above:
-
Automation: instant ad hoc API (and Admin UI) with the
ApiLogicServer createcommand -
Declarative Rules - security and multi-table logic, providing a 40X code reduction for backend half of these systems
-
Kafka Logic Integration
-
Send from logic events
-
Consume by extending
kafka_consumer -
Services, including:
-
Mapperservices to transform rows and dict -
FlaskKafkafor Kafka listening, threading, and annotation invocation
-
-
-
Standards-based Customization:
-
Standard packages: Python, Flask, SQLAlchemy, Kafka...
-
Using standard IDEs
-
As a result, we built 2 non-trivial systems with a remarkably small amount of Python code:
| Type | Code |
|---|---|
| Custom B2B API | 10 lines |
| Check Credit Logic | 5 rules |
| Row Level Security | 1 security declaration |
| Send Order to Shipping | 20 lines |
| Process Order in Shipping | 30 lines |
| Mapping configurations to transform rows and dicts |
45 lines |
For more information on API Logic Server, click here.
Appendix
Status
Tested on Mac
Apendix: Customizations
View them here.
Appendix: Procedures
Specific procedures for running the demo are here, so they do not interrupt the conceptual discussion above.
You can use either VSCode or Pycharm.
1. Establish your Virtual Environment
Python employs a virtual environment for project-specific dependencies. Create one as shown below, depending on your IDE.
For VSCode:
Establish your venv, and run it via the first pre-built Run Configuration. To establish your venv:
python -m venv venv; venv\Scripts\activate     # win
python3 -m venv venv; . venv/bin/activate      # mac/linux

pip install -r requirements.txt
For PyCharm, you will get a dialog requesting to create the venv; say yes.
See here for more information.
2. Start and Stop the Server
Both IDEs provide Run Configurations to start programs. These are pre-built by ApiLogicServer create.
For VSCode, start the Server with F5, Stop with Shift-F5 or the red stop button.
For PyCharm, start the server with CTL-D, Stop with red stop button.
3. Entering a new Order
To enter a new Order:
-
Click `ALFKI``
-
Click
+ ADD NEW ORDER -
Set
Notesto "hurry", and pressSAVE AND SHOW -
Click
+ ADD NEW ITEM -
Enter Quantity 1, lookup "Chai", and click
SAVE AND ADD ANOTHER -
Enter Quantity 2000, lookup "Chang", and click
SAVE -
Observe the constraint error, triggered by rollups from the
OrderDetailto theOrderandCustomer -
Correct the quantity to 2, and click
Save
4. Update the Order
To explore our new logic for green products:
-
Access the previous order, and
ADD NEW ITEM -
Enter quantity 11, lookup product
Chang, and clickSave.