Basic Demo
Product Tour (Start Here)
This illustrates basic GenAI-Logic operation:
- Creating projects from new or existing databases, providing a MCP-enabled API and an Admin App
- Adding declarative logic and security, and
- Customizing your project using your IDE and Python
Please load `.github/.copilot-instructions.md`
🤖 Ready to Explore?
Recommended: Say to Copilot: "Guide me through basic_demo" (30-45 min hands-on tour)
Alternative: Follow the sections below at your own pace
The entire process takes 20 minutes; usage notes:
- Important: look for readme files in created projects
- You may find it more convenient to view this in your Browser
- A slide show summary is available on our Web Site

1. Create and Run
API Logic Server can create projects from existing databases, or use GenAI to create projects with new databases. Let's see how.
From Existing Database
This is the best way to start:
- Open a terminal window: Terminal > New Terminal
- Create Project from Existing Database:
Note: the
db_urlvalue is an abbreviation for a test database provided as part of the installation. You would normally supply a SQLAlchemy URI to your existing database, e.g.genai-logic create --project_name=basic_demo --db_url=sqlite:///samples/dbs/basic_demo.sqlite.
The database is Customer, Orders, Items and Product

GenAI: New Database
Alternatively, you can create a project and a new database from a prompt, using GenAI.
Don't do this if you are executing the basic Product Tour.
There are 3 ways to use GenAI:
- WebGenAI - in the Browser, via pubic website - click here, or
- GenAI - in the Browser, via docker - click here, or
- GenAI CLI - click here
To use the GenAI CLI:
- If you have signed up (see Get an OpenAI Key, below), this will create and open a project called
genai_demofromgenai_demo.prompt(available in left Explorer pane):
genai-logic genai --using=system/genai/examples/genai_demo/genai_demo.prompt --project-name=genai_demo
- Or, you can simulate the process (no signup) using:
genai-logic genai --repaired-response=system/genai/examples/genai_demo/genai_demo.response_example --project-name=genai_demo
For background on how it works, click here.
Open in your IDE and Run
You can open with VSCode, and run it as follows:
-
Start the Server: F5 (also described in the Appendix).
- Your virtual environment is automatically configured in most cases; see the Appendix (Procedures / Detail Procedures) if that's not working.
-
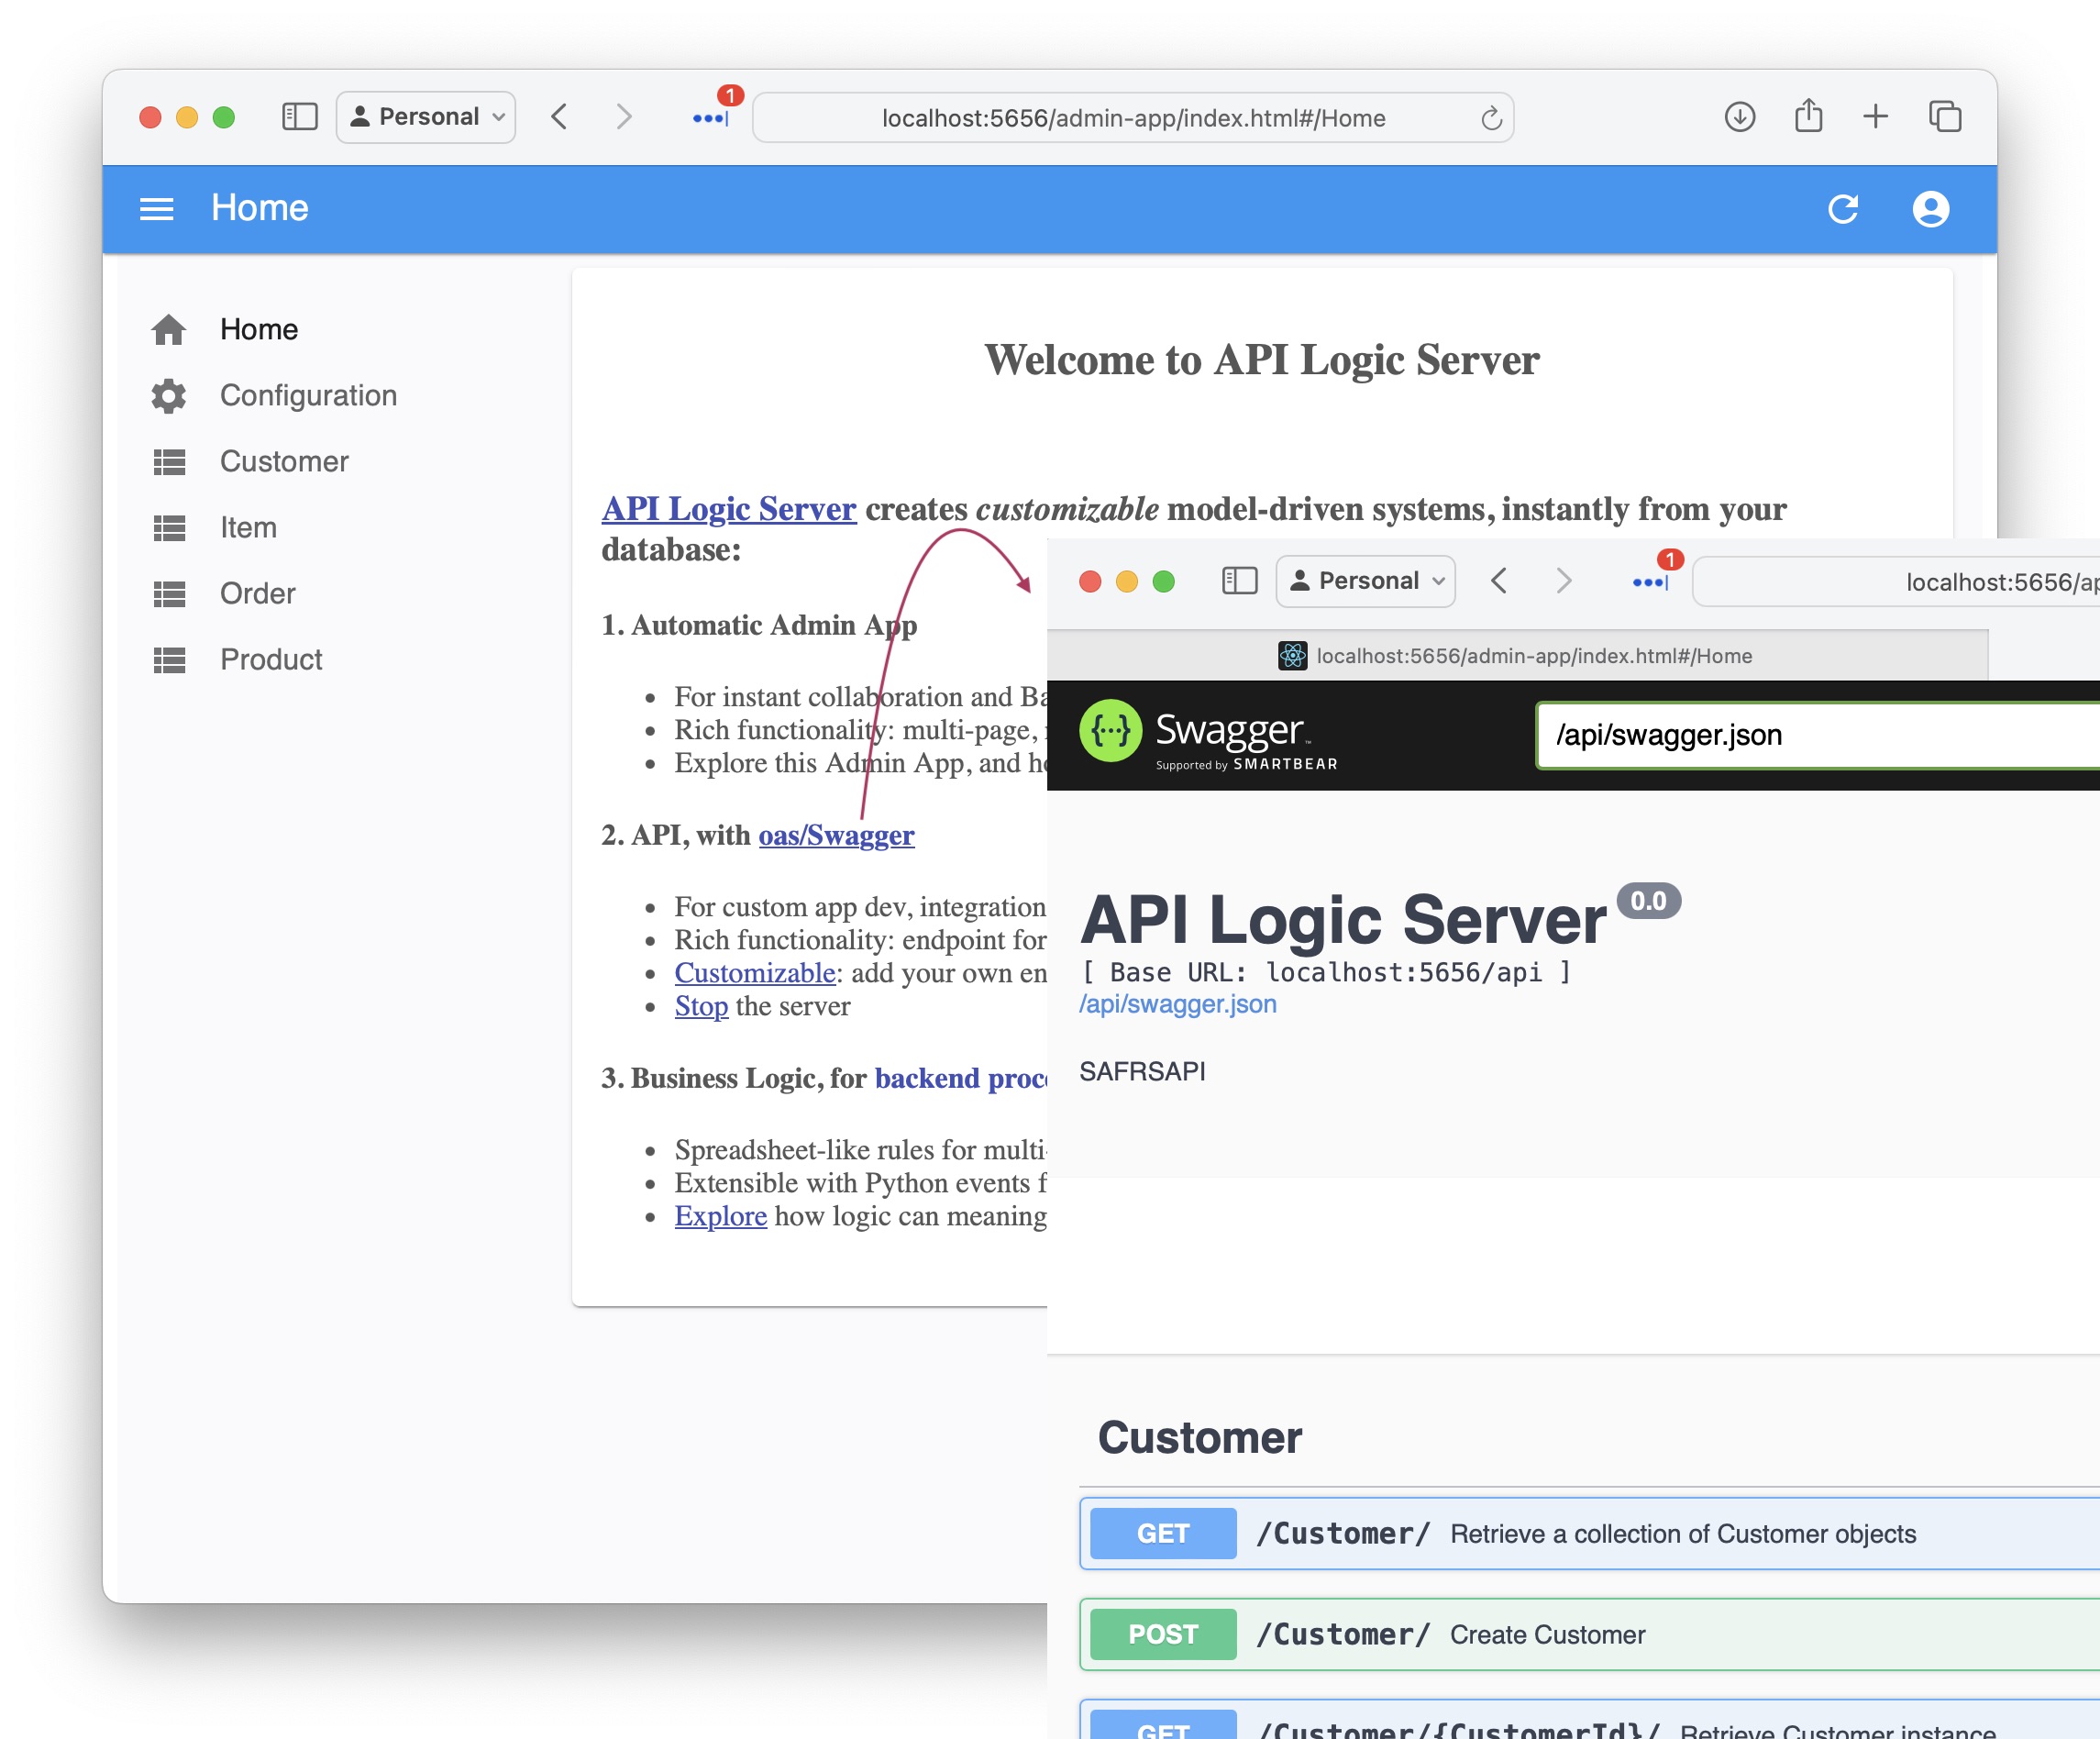
Start the Admin App: either use the links provided in the IDE console, or click http://localhost:5656/. The Admin App screen shown below should appear in your Browser.
The sections below explore the system that has been created (which would be similar for your own database).
API with Swagger
The system creates an API with end points for each table, with filtering, sorting, pagination, optimistic locking and related data access -- self-serve, ready for custom app dev.
See the Swagger
Admin App
It also creates an Admin App: multi-page, multi-table -- ready for business user agile collaboration, and back office data maintenance. This complements custom UIs created with the API.
You can click Customer Alice, and see their Orders, and Items.
See the Admin App

2. Custom UI: GenAI, Vibe
The app above is suitable for collaborative iteration to nail down the requirements, and back office data maintenance. It's also easy to make simple customizations, using the yaml file.
For more custom apps, you get complete control by generating app source code, which you can then customize in your IDE, e.g. using Vibe Natural Language. In the Manager, see the Sample: Vibe Development Backend.
- Instead of creating data mockups, you have a running API server with real data
- Instead of starting from scratch, you have a running multi-page app
- And, you'll have projects that are architecturally correct: shared logic, enforced in the server, available for both User Interfaces and services.
- Then, use you favorite Vibe tools with your running API:
Below is an example from Northwind: click here

3. MCP-Ready APIs
Your project is MCP-ready - enter this in your AI Assistant to run a simple query: List customers with credit_limit > 1000. For more on MCP, in the Manager, try the sample: Govererned MCP Server.
4. Declare Logic And Security
While API/MCP/UI automation is a great start, it's critical to enforce logic and security. You do this in your IDE. Here's how.
The following add_customizations process simulates:
- Adding security to your project, and
- Using your IDE to declare logic and security in
logic/declare_logic.shandsecurity/declare_security.py.
Declared security and logic are shown in the screenshots below.
It's quite short - 5 rules, 7 security settings.
To add customizations, in a terminal window for your project:
1. Stop the Server (Red Stop button, or Shift-F5 -- see Appendix)
2. Add Customizations
Security: Role Based Access
The add_customizations process above has simulated using your IDE to declare security in logic/declare_logic.sh.
To see security in action:
1. Start the Server F5
2. Start the Admin App: http://localhost:5656/
3. Login as s1, password p
4. Click Customers
Observe:
1. Login now required
2. Role-Based Filtering
Observe you now see fewer customers, since user s1 has role sales. This role has a declared filter, as shown in the screenshot below.
3. Transparent Logging
See Security Declarations
The screenshot below illustrates security declaration and operation:
-
The declarative Grants in the upper code panel, and
-
The logging in the lower panel, to assist in debugging by showing which Grants (
+ Grant:) are applied:

Logic: Derivations, Constraints
Logic (multi-table derivations and constraints) is a significant portion of a system, typically nearly half. API Logic Server provides spreadsheet-like rules that dramatically simplify and accelerate logic development.
Rules are declared in Python, simplified with IDE code completion. The screen below shows the 5 rules for Check Credit Logic.
The add_customizations process above has simulated the process of using your IDE to declare logic in logic/declare_logic.sh.
To see logic in action:
1. In the admin app, Logout (upper right), and login as admin, p
2. Use the Admin App to access the first order for Customer Alice
3. Edit its first item to a very high quantity
The update is properly rejected because it exceeds the credit limit. Observe the rules firing in the console log - see Logic In Action, below.
💡 Logic: Multi-table Derivations and Constraint Declarative Rules.
Declarative Rules are 40X More Concise than procedural code.
For more information, click here.
See Logic In Action
Declare logic with WebGenAI, or in your IDE using code completion or Natural Language:

a. Chaining
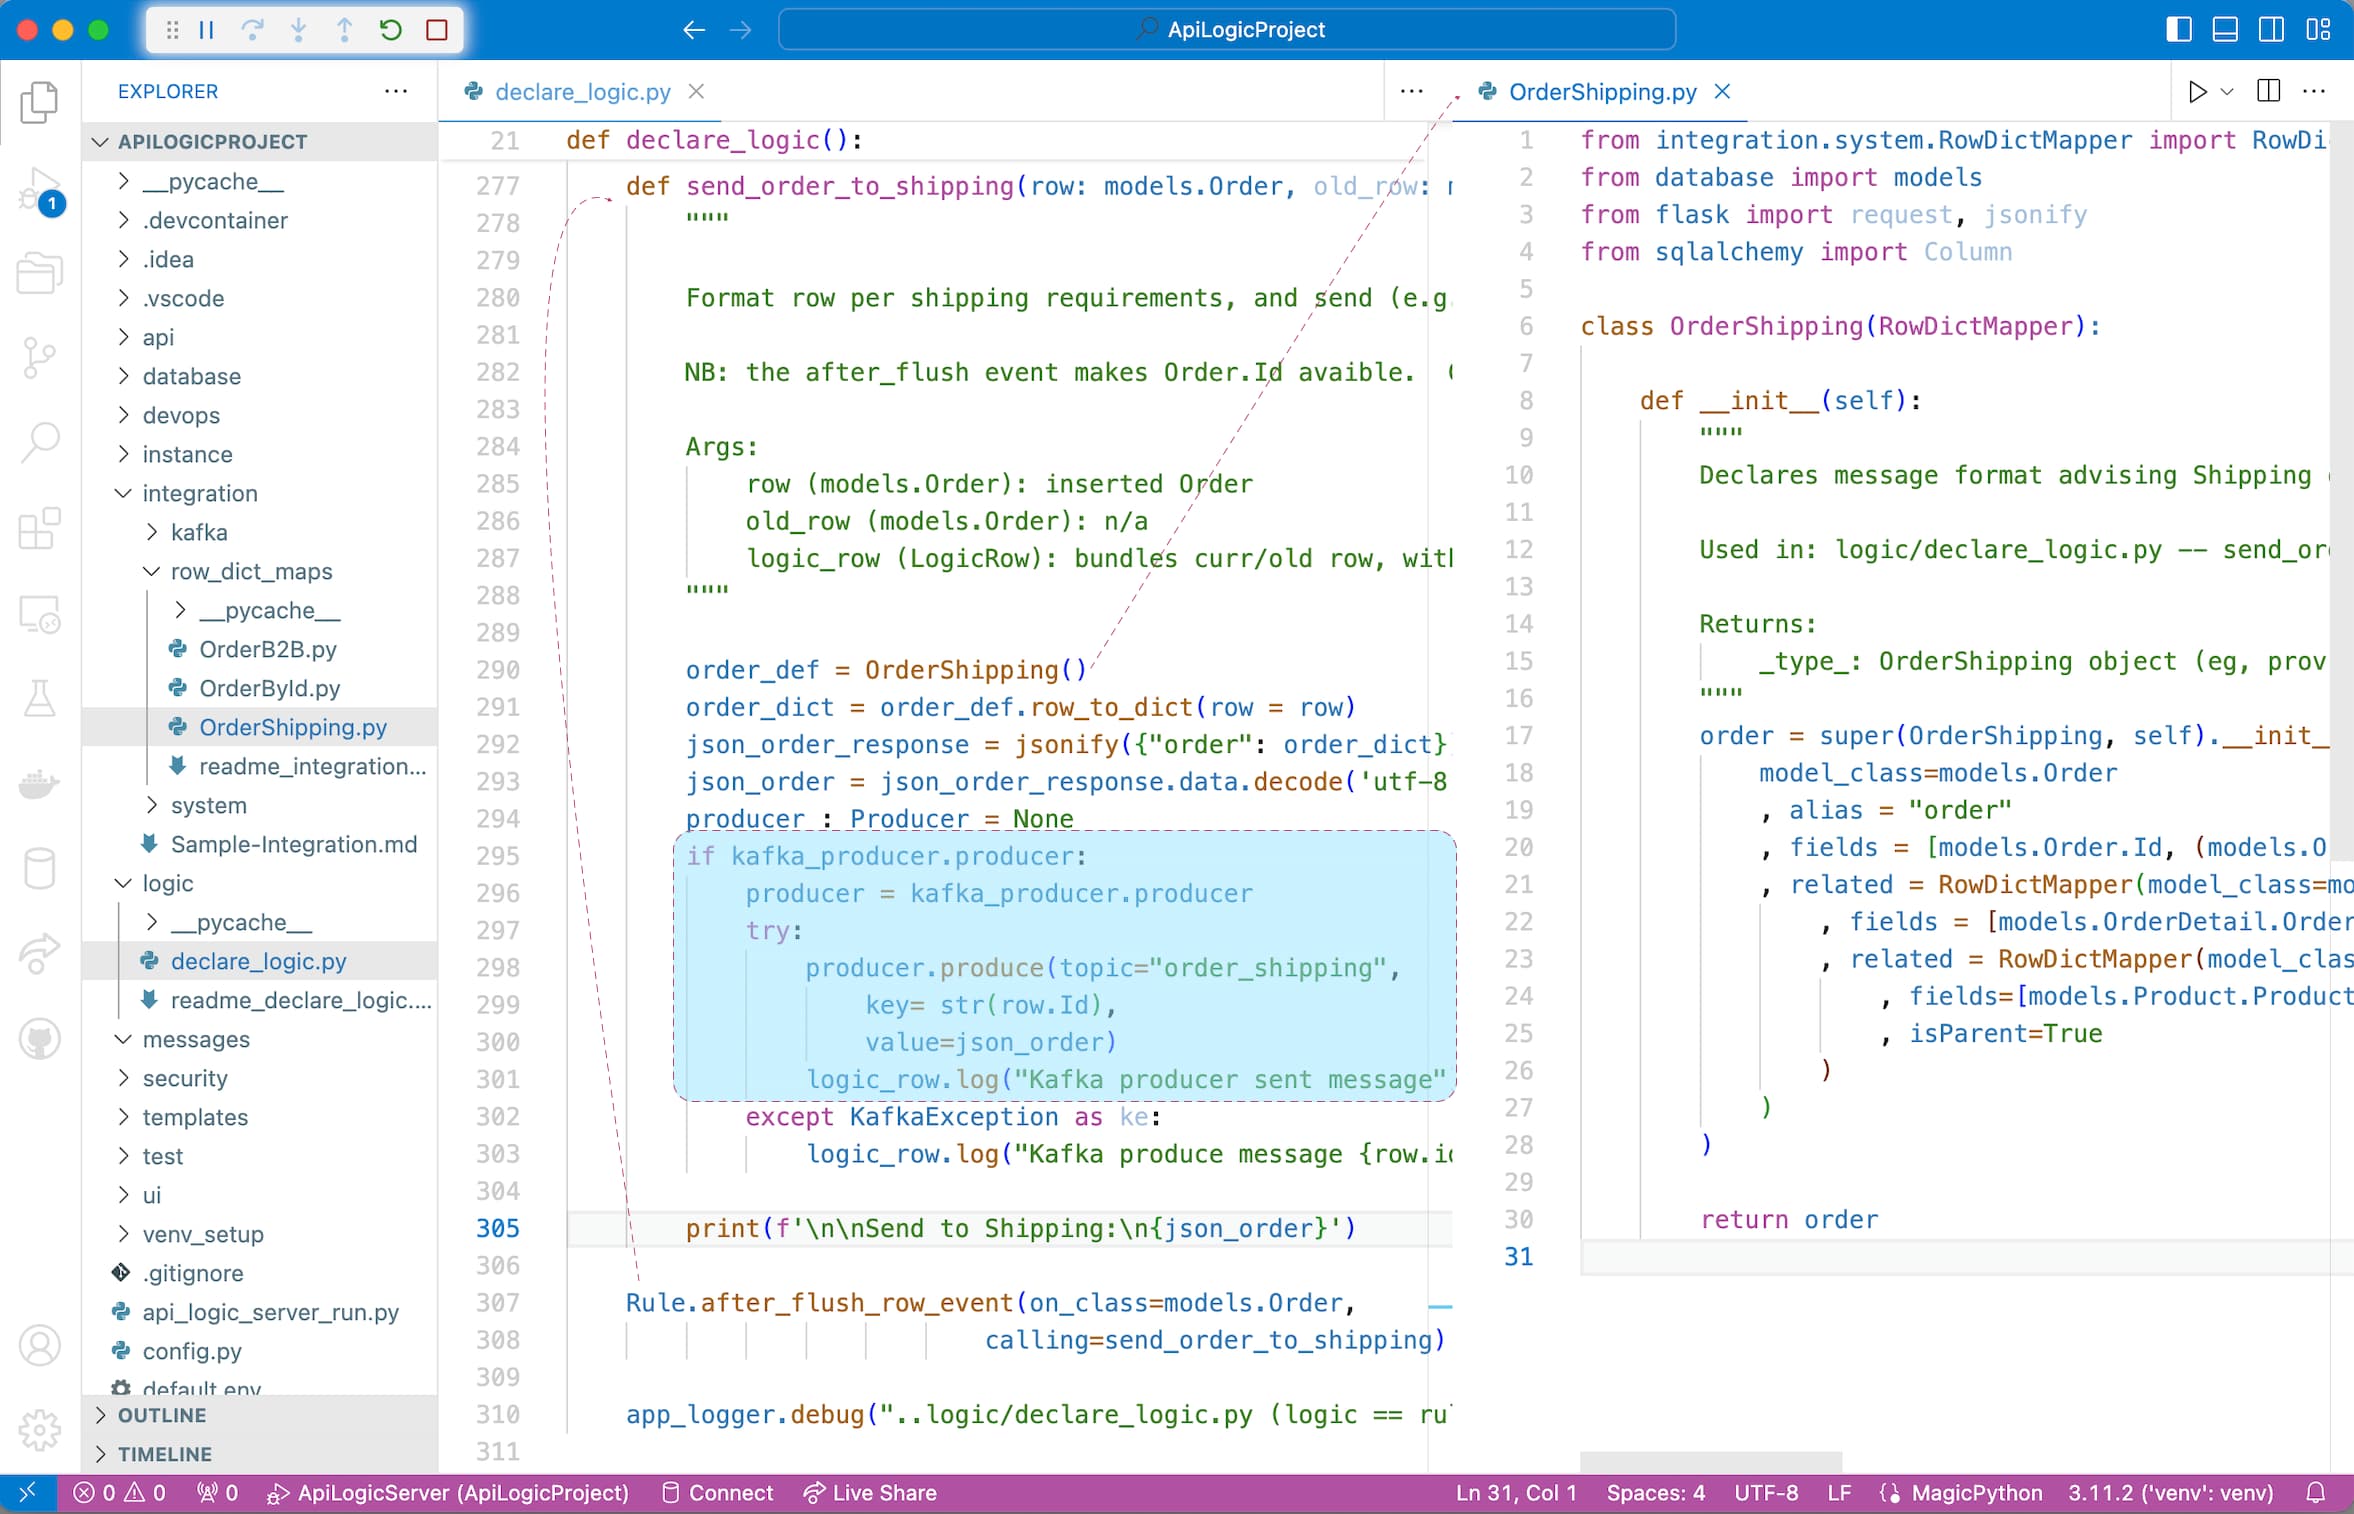
The screenshot below shows our logic declarations, and the logging for inserting an Item. Each line represents a rule firing, and shows the complete state of the row.
Note that it's a Multi-Table Transaction, as indicated by the indentation. This is because - like a spreadsheet - rules automatically chain, including across tables.

b. 40X More Concise
The 5 spreadsheet-like rules represent the same logic as 200 lines of code, shown here. That's a remarkable 40X decrease in the backend half of the system.
💡 No FrankenCode
Note the rules look like syntactically correct requirements. They are not turned into piles of unmanageable "frankencode" - see models not frankencode.
c. Automatic Re-use
The logic above, perhaps conceived for Place order, applies automatically to all transactions: deleting an order, changing items, moving an order to a new customer, etc. This reduces code, and promotes quality (no missed corner cases).
d. Automatic Optimizations
SQL overhead is minimized by pruning, and by elimination of expensive aggregate queries. These can result in orders of magnitude impact.
e. Transparent
Rules are an executable design. Note they map exactly to our natural language design (shown in comments) - readable by business users.
Optionally, you can use the Behave TDD approach to define tests, and the Rules Report will show the rules that execute for each test. For more information, click here.
MCP: Logic, User Interface
Logic is automatically executed in your MCP-enabled API. For example, consider the following MCP orchestration:

When sending email, we require business rules to ensure it respects the opt-out policy:

The server is automatically mcp-enabled, but we might also want an mcp user-interface client:
1. Stop the Server
2. Create an MCP Client Executor like this:
3. Restart the Server
With the server running, test it like this:
- Test MCP
You can do this in the command line, or via the admin app.
Use the Admin App: (shown above), and follow step 4 on the Home page to see a Business-User-friendly example.
Or, use the command line.
Since the CLI does not pass an auth token, you must first stop the server and disable security.
MCP from the command line:
For more on MCP, click here.
5. Iterate with Rules and Python
Not only are spreadsheet-like rules 40X more concise, they meaningfully simplify maintenance. Let's take an example:
Give a 10% discount for carbon-neutral products for 10 items or more.
The following add-cust process simulates an iteration:
-
acquires a new database with
Product.CarbonNeutral -
issues the
genai-logic rebuild-from-databasecommand that rebuilds your project (the database models, the api), while preserving the customizations we made above. -
acquires a revised
ui/admin/admin.yamlthat shows this new column in the admin app -
acquires this revised logic - in
logic/declare_logic.py, we replaced the 2 lines for themodels.Item.Amountformula with this (next screenshot shows revised logic executing with breakpoint):
    def derive_amount(row: models.Item, old_row: models.Item, logic_row: LogicRow):
        amount = row.Quantity * row.UnitPrice
        if row.Product.CarbonNeutral and row.Quantity >= 10:
           amount = amount * Decimal(0.9)  # breakpoint here
        return amount

    Rule.formula(derive=models.Item.Amount, calling=derive_amount)
To add this iteration, repeat the process above - in a terminal window for your project:
1. Stop the Server (Red Stop button, or Shift-F5 -- see Appendix)
2. Add Iteration
- You can ignore the warning regarding 'mcp-SysMcp' - not present
3. Set the breakpoint as shown in the screenshot below
4. Test: Start the Server, login as Admin
5. Use the Admin App to update your Order by adding 12 Green Items
At the breakpoint, observe you can use standard debugger services to debug your logic (examine Item attributes, step, etc).

This simple example illustrates some significant aspects of iteration, described in the sub-sections below.
💡 Iteration: Automatic Invocation/Ordering, Extensible, Rebuild Preserves Customizations
a. Dependency Automation
Along with perhaps documentation, one of the tasks programmers most loathe is maintenance. That's because it's not about writing code, but it's mainly archaeology - deciphering code someone else wrote, just so you can add 4 or 5 lines that will hopefully be called and function correctly.
Rules change that, since they self-order their execution (and pruning) based on system-discovered dependencies. So, to alter logic, you just "drop a new rule in the bucket", and the system will ensure it's called in the proper order, and re-used over all the Use Cases to which it applies. Maintenance is faster, and higher quality.
b. Extensibile with Python
In this case, we needed to do some if/else testing, and it was convenient to add a pinch of Python. Using "Python as a 4GL" is remarkably simple, even if you are new to Python.
Of course, you have the full object-oriented power of Python and its many libraries, so there are no automation penalty restrictions.
c. Debugging: IDE, Logging
The screenshot above illustrates that debugging logic is what you'd expect: use your IDE's debugger. This "standard-based" approach applies to other development activities, such as source code management, and container-based deployment.
d. Customizations Retained
Note we rebuilt the project from our altered database, illustrating we can iterate, while preserving customizations.
API Customization: Standard
Of course, we all know that all businesses the world over depend on the hello world app. This is provided in api/customize_api. Observe that it's:
-
standard Python
-
using Flask
-
and, for database access, SQLAlchemy. Note all updates from custom APIs also enforce your logic.
Explore the custom API in api/api_discovery/order_b2b.py, and test it using swagger:
- Access the Home page of the Admin App
- Access the swagger
- Test the b2b API / Logic, as shown below:

Messaging With Kafka
Along with APIs, messaging is another technology commonly employed for application integration. See the screenshot below; for more information, see Sample Integration.
6. Deploy Containers: No Fees
API Logic Server also creates scripts for deployment. While these are not required at this demo, this means you can enable collaboration with Business Users:
- Create a container from your project -- see
devops/docker-image/build_image.sh - Upload to Docker Hub, and
- Deploy for agile collaboration.